Thursday, June 26, 2014

Haul of June 2014

Assalaamu'alaykum
It's getting closer to end of June as well as the beginning of Ramadhan Kareem.

"Sebelum puasa, mohon maaf lahir batin buat teman-teman semua"

Agak kalap bulan ini, banyak haul yang dibeli pake gesek kartu huhuhuhuhu.... Mungkin karena inget kalo ntar mo lebaran kan dapet THR yah, jadi gesek aja dulu. Perkara bayar, ntar aja pas THR udah turun heheheh.

Let's take a sneak peek:


***

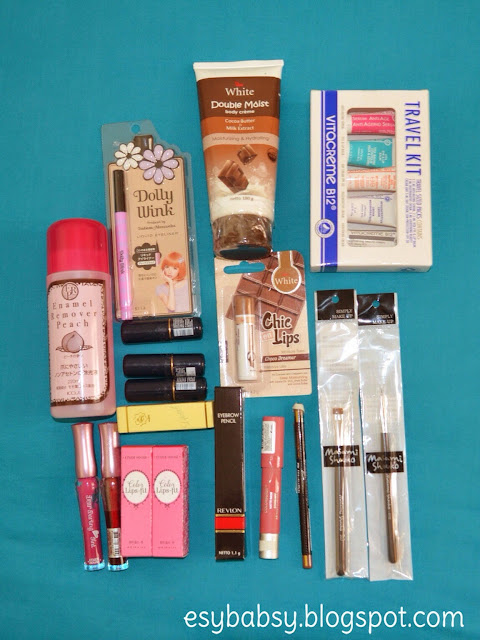
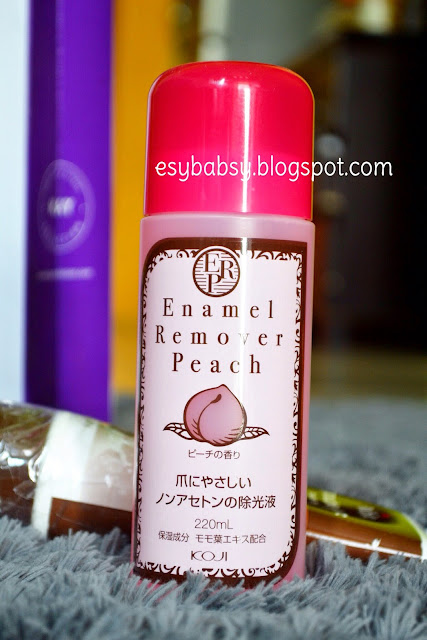
Koji Nail Enamel Remover
It cost me IDR 80K (USD 7) for this. Seems quite expensive, but take a good look at the content: it's 220 ml. You might say the price is pretty worth it, no?


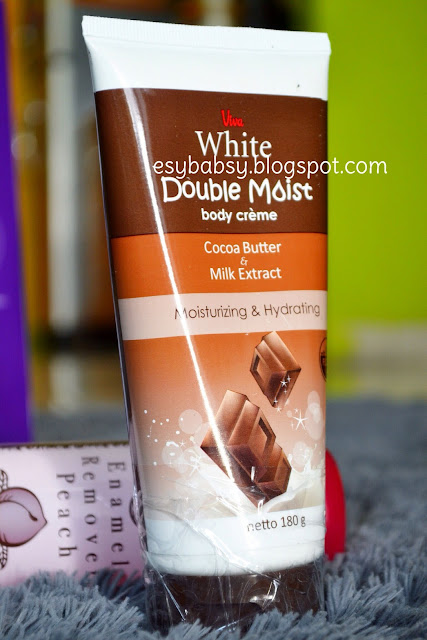
Viva White Double Moist Body Creme (Cocoa & Milk)
This is to replace my old The Body Shop Vanilla Body Butter. I have a huge liking to beauty stuff with cookies aroma: Vanilla, Milk, Brown Sugar, Chocolate, etc. Since Viva doesn't have the Vanilla scent, I think a chocolate one will do. Drool...


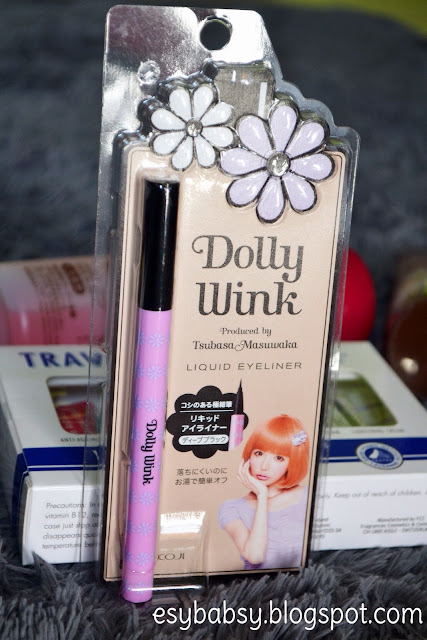
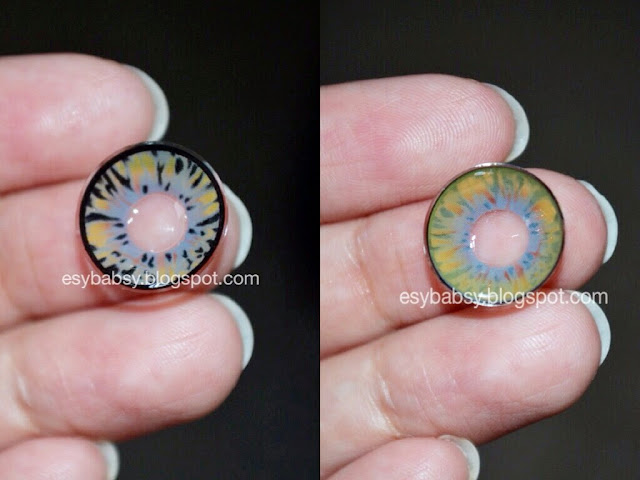
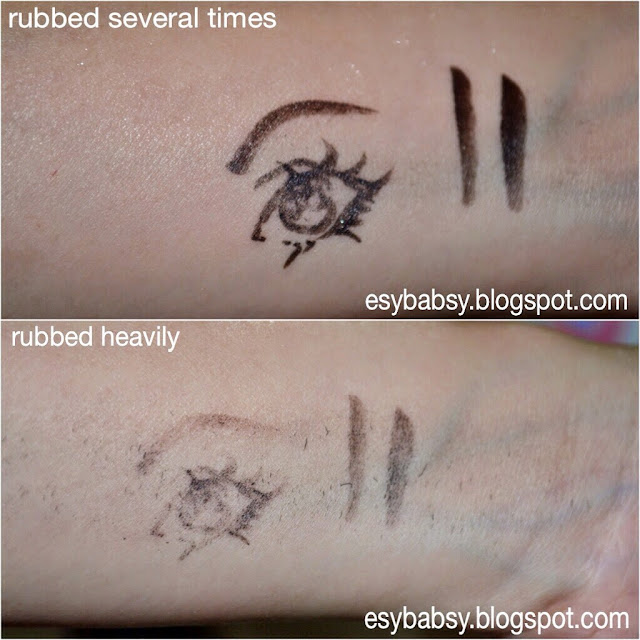
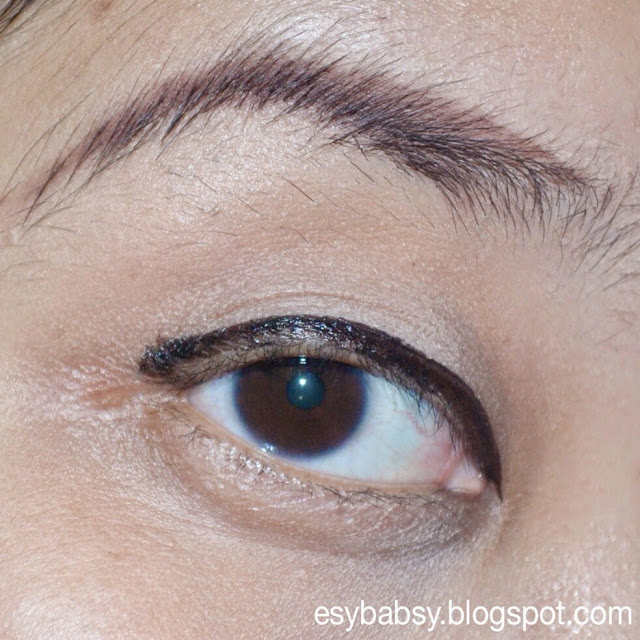
Koji Dolly Wink Liquid Liner (Black)
Found this when I visited Kay Collection store and fascinated right away by the stuff they provide. This pen has been in my wishlist for a long time and is my most expensive makeup product, for real. It's 220K (USD 21). Never been a fan of expensive makeups, but this one is worth to try, I think...


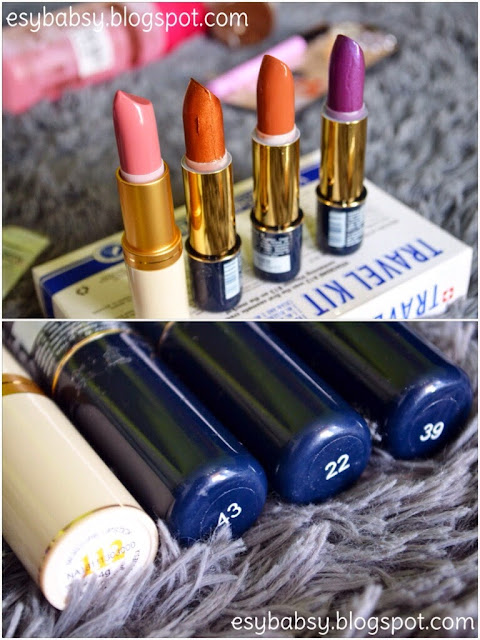
Viva Lipsticks in 112, 43, 22, and 39.
Viva Cosmetics never named their lipsticks except for silly numbers. LOLs. 112 and 22 are such pretty everyday colors. And the rest is just for makeup experiments: gold and dark purple. These babies are cheap as nasi goreng abang-abang. So, one rule when buying this lipstick: never buy one shade only. You'll regret it.


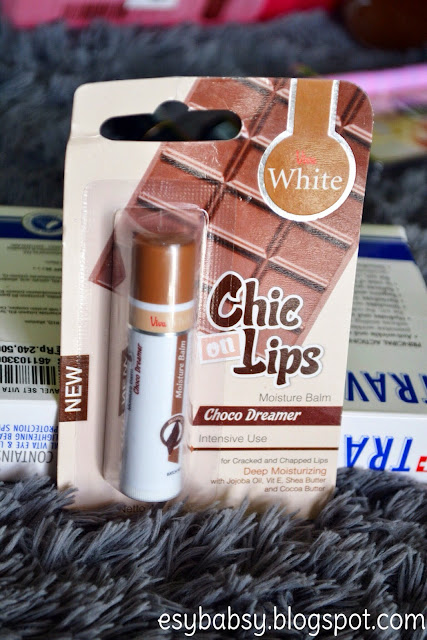
Viva White Chic Lips (Choco Dreamer)
Didn't I told you I love cookies scents?


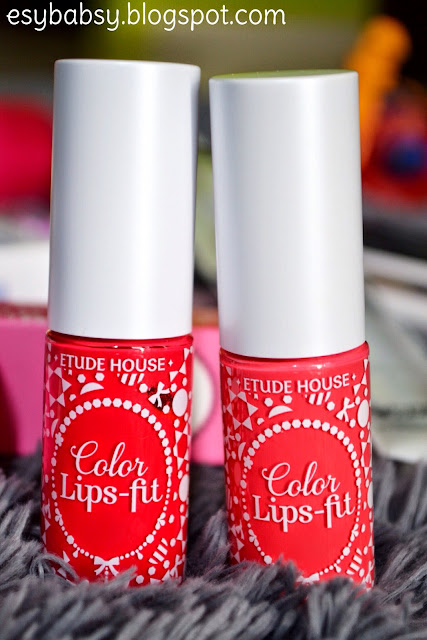
Etude House Color Lips-Fit in RD301 and PK003
Cute matte liquid lip coloring. Wait for the upcoming reviews, they're on my draft already!


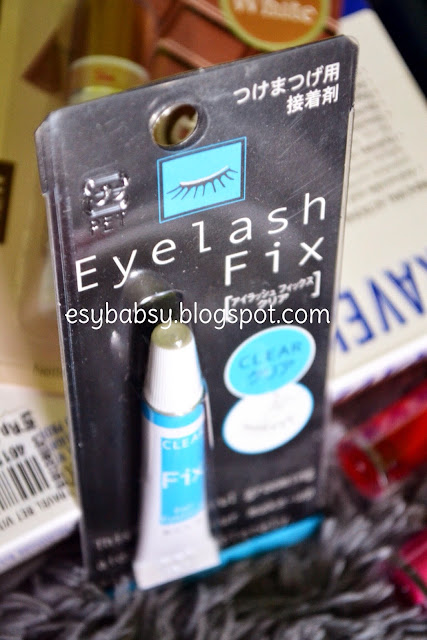
Koji Eyelash Fix (Clear)
Another great item by Koji. I heart Koji! My old eyelashes glue has run out already and I bought exactly the same item. Bought this in Kay Collection as well.


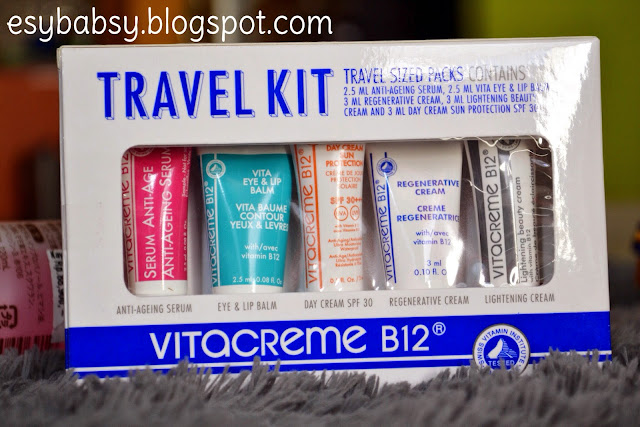
Vitacreme B12 Skincare Travel Kit
This one is a gift for shopping certain amount in Kay Collection. Never heard of this product before, but I think I'll try this. Included: Anti-Aging Serum, Eye & Lip Balm, Day Cream SPF 30, Regenerist Cream, and Lightening Cream. Btw, that Eye & Lip Balm is pretty interesting. A product for lip and eye? You gotta be kidding me! 


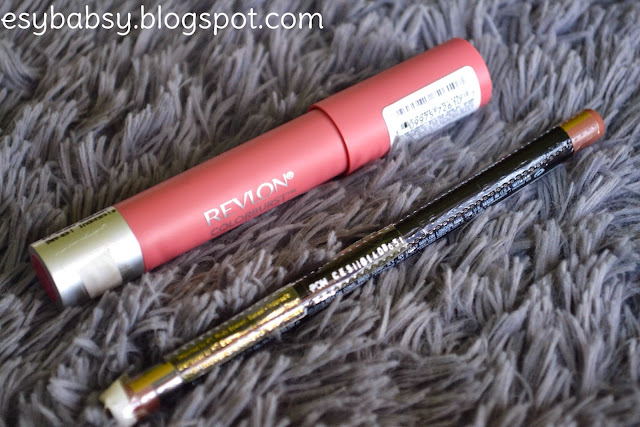
Revlon Matte Balm in 205 and Revlon Colorstay Lip Pencil in Nude
The nude lip pencil has been my target, but that matte balm is just a result of an impulsive purchasing because the color is a pretty nude pink shade. Can't wait to ry it on, but there are so many lip colors with similar shades in my drawer already.... Me and my shopping hobby.


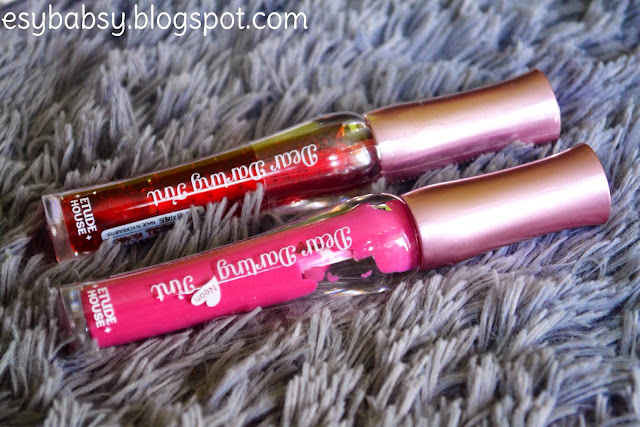
Etude House Dear Darling Neon Tint (Pink) and Dear Darling Tint (Orange)
These are the cutest things amongst the cutest things. LOLs. Nice colors, nice scents, and nice taste as well. Feels like dabbing a pint of bitter colorful liquid syrup on my lips.


Revlon Eyebrow Pencil in Dark Brown (02)
This is my most expensive eyebrow pencil. I used to have Silky Girl eyebrow pencil which is a GREAT product for me, but since I lost it, and could not find the replacement because many places I've searched were run out of the item, so I bought this.. terpaksa banget... Udah mahal, kotak jadul, pensilnya jadul, moga-moga aja enak dipakenya. Kata SPG-nya sih gitu.


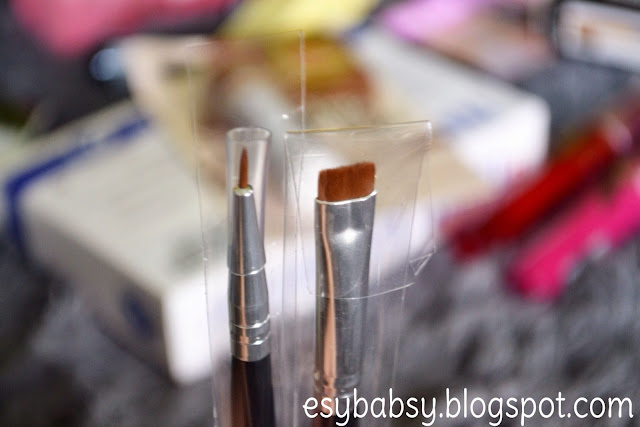
Masami Shoukou Eyeliner Brush and Flat Brush
Forgot the numbers of these brushes but these are the most stuff I need to draw detailed result. Bought this n Kay Collection as well. Anyway, baru tau deh kalo brush Masami Shoukou itu murah ya... well ga murah banget sih, tapi harganya sama brush Tammia beda tipis.

***

Well, that's all my hauls. Actually, there are some more, but as usual, I forgot where I put them. Barang hilang kalo ngga dicari, biasanya suka ketemu. Somehow, tau-tau ntar muncul aja gituh.

One more thing to say:

"There will never be enough time, and money, to feed your greed"

I wrote that quote. That's my favorite one to describe a haul. Agree? 
See you and Wassalam!


Wednesday, June 25, 2014

Review: Baby Color Candy Rainbow Softlens (Gray)

Dear all my friends,
I have been using colored softlenses a lot lately due to numbers of makeup experiments I did. I've been practicing a lot and wearing softlenses is a must, otherwise all I see is just blots of colors. The problem is, my eyes are very sensitive, so finding the right ones is quite challenging.

I usually wear softlenses from the Princess series due to their comfort, but I just want to try others: Baby Color Candy Rainbow.


The packaging is my favourite, blisters! They are easier to be undone and won't hurt my fingers. These babies are available from plano up to minus 10. I chose the maximum power.

There is a story behind the lens power I chose: minus 10.00. I'll tell you about that later on. 

There are four variants of these series: blue, pink, gray, and chocolate/honey. Mine is gray. The seller said gray was the brighest colors. You can google for yourself and find how beautiful each colors are!


Love the pattern. Although it's gray, but there are blots of yellow shade. And the black rings will absolutely makes your eyes look bigger.

Left: Outter side
Right: Inner side

Wore on my eyes. See? They appear much larger and lighter.


Wore on an EOTD experiment.


The whole face look.

 Soooo, this is why I chose minus 10.00. My actual diopter needs for softlens is only -9.00, but I also have Astigmatism -2.75. By doing some googling, a few source said that you can migrate your astigmatism power to your softlens minus power. For example, if you have -5.00 and astigmatism -1.00, so you can wear softlens with -6.00 power. This is, of course, to reduce the cost since toric softlenses are six times more expensive. But you know what, it's absolutely nonsense, at least for me. I still experience seeing blurry lines. Instead, the effect is worse, I see things even smaller than their actual sizes, so it kinda makes me a bit dizzy. And it is soooo hard to draw eyeliners. Mistakes are everywhere. Gah!

Other than the mistakes on the power I chose, I do not experience any problem at all by wearing these softlenses. My sensitive eyes usualy will show red circles around the eyeballs when I wore wrong softlenses, but it doesn't happen with these. I also use this for indoor activities in ACed rooms with no solution drop for more than 8 hours, and I don't even need Cendo Xitrol application afterwards.

How these babies look on your face (or how these makes your face look like, to be exact) is an appearence booster for about, 30% better I guess? LOLs. As you can see by the picture, the color is an absolute bright. Don't look for these if 'au naturel' is your cup of tea, my friends. Softlens ini spesifik dibuat untuk orang-orang dengan jiwa 'banci tampil' minimal 30% lah. Hehehe...

One thing I kinda doubt about these are the manufacturer, they said it's Korean. But you should check out their official page www.baby-color.com, and I'm pretty sure the language is not Korean.... Chinese perhaps? What do you think?

Specs:
  • Manufacturer : Baby Color
  • Origin : Korea
  • Diameter: 19.80 mm
  • Water Content : 60%
  • Life spam : up to 12 months with maximum care
  • Color variant : gray, blue, pink, brown/honey
  • Power : -0.00 to 10.00
Verdicts:
  • Bright color
  • Instant dolly effect
  • Very comfortable
  • Price : around IDR 150K (USD 15) in many softlenses online shops, but I don't know where to find these offline.


Last word?
Cintaaaa banget sama softlens ini ^_^
Tapi jangan beli minus ini lagi...


Sunday, June 22, 2014

Review: MIZZU Eyeliner Pen (Brown)

It's Mizzu time!

Siapa yang belom kenal eyeliner lokal ini? Aku juga baru beberapa bulan ini aja tau eyeliner Mizzu, pertama kali dikasih mama mertua yang warna hitam, ternyata aku suka. Dan, setelah hampir habis, aku memutuskan untuk beli yang warna coklat. Pengen aja nyoba warna laen, kan elener item udah banyak ceritanya, cieee...

Sebelum lanjut ke review, aku sedikit penasaran sama Mizzu ini. Jadi aku buka website-nya di www.mizzucosmetics.com dan rasa penasaran itu berubah menjadi kekecewaan. Karena nggak banyak info yang bisa kudapatkan di sana. Cuma alamat kantornya yang bertempat di Pluit, Jakarta, plus gambar produk-produk Mizzu yang masih berkisar di area mata: eyeshadow, eyeliner, dan mascara. Itupun cuma ada foto produknya, tanpa spesifikasi apa pun. Benar-benar minimalis. Plus, jangan harap bisa belanja online di sana ya. Entahlah, mungkin website ini masih dalam tahap pengembangan.

***

packaging


Kemasan standar lah. Terbuat dari plastik dan dibungkus dalam kotak terbuat dari mika. Kotaknya agak tajam, hati-hati kalo pas dipegang anak kecil ya. Warna kemasannya sesuai dengan jenis warnanya. By the way, pena-nya itu sebetulnya disegel plastik sampai ke tutup, tapi udah aku buka plastiknya sebagian. Hehehe...


Yang belum tahu jenis eyeliner ini apa, ini bentuk pen ya, teman-teman. Ujungnya itu kayak felt tip tapi lembut. Kalo felt tip kan biasanya keras yah. Apa ya nyebutnya?


The ingredients.


***

swatches & performance


The swatches taken in with camera flash and natural lighting. Suka sekaliii dengan jenis warna coklatnya. Aku pikir tadinya bakal coklat kemerahan seperti warna pensil alis Viva, tapi ternyata coklat tua yang kalo dilihat sekilas mirip hitam, tapi tidak sepekat hitam. Ujung felt tip nya itu juga pas, ga terlalu lembut juga tidak terlalu keras. Jadi buat bikin gambar-gambar kaligrafi atau gambar apa lah itu di wajahmu, bisa kok pake eyeliner ini. Sekali coret, warnanya langsung keluar jelas. Kalo mau garis yang agak tebel, tekan aja kuasnya. Kalo mau yang tipis, colek aja dikit.


Karena di klaim waterproof, aku pergilah ke sungai wastafel buat cuci tangan. Boleh lah, di alirin air begitu, garisnya gak goyah. Berarti dipake buat Wudhu masih oke. Tapi ga tau kalo buat berenang.


Naaaah, kalo yang ini hasilnya setelah di rub. Aku tahu kalo ga ada elener yang bakal tahan digosok, even yang sekelas Bobbi Brown sekalipun pasti akan hilang. Tapi pengen liat aja, sekuat apa aku harus menggosok sampai garisnya benar-benar hilang. Dengan catatan: aku menggosoknya setelah tersiram air. Gambar yang atas digosok beberapa kali, agak pudar meski masih tetep keliatan. Yang bawah digosok pake tenaga kuli bangunan: hilang booo, tapi hilangnya ngga smudge, melainkan jadi small flakes atau kayak daki kalo digosok. Hahaha.


Contoh di mata, addduh berantakan. Tanpa softlens dan kacamata, dunia terlihat begitu buram hehehe. Tapi kira-kira seperti itulah kalo di zoom di mata. Sekilas mirip hitam kan?


Ini versi rapi nya, hehehe, yang ini niat dandan tapi ngga terlalu jelas karena pake kamera HP. Warnanya keliatan soft dibanding hitam.

***

Satu kelemahan dari elener ini, kalo aku udah set mata dengan eyeshadow komplit, warnanya jadi susah keluar! So aku harus coret garis beberapa kali sampai mendapatkan warna yang diinginkan. Apalagi kalo udah mo habis, beuuugh, susah banget intens-nya. Tapi so far itu aja minusnya, masih bisa diakalin.

Kelopak mataku berminyak sekali, dan mataku sensi, kena angin aja langsung nangis hiks hiks... Makanya aku ga pernah pake elener di bawah mata karena aku pasti akan terlihat seperti Robert Smith-nya The Cure. Tapi so far dari pengalamanku memakainya di kelopak mata atas, elener ini gak ikutan luntur ke kantung mata. Begitu beberapa jam warnanya akan terlihat sedikit pudar, mungkin karena keringat. Hal yang sama terjadi begitu selesai ber-wudhu. Tapi nggak masalah buatku, yang penting nggak bleber ke bawah, itu aja.


Penilaian:
  • Warnanya coklat gelap
  • Lumayan intens
  • Buildable result
  • Kuasnya ngga terlalu keras atau lembut, user friendly
  • Warnanya susah keluar kalo kena eyeshadow kebanyakan
  • Lumayan waterproof and smudgeproof
  • Kalau luntur hasilnya flaky, bukan smudge
  • Hasilnya semi glossy, tapi ngga lebay
  • Di mataku ngga perih
  • Murmer (IDR 30K) kira-kira
  • Mudah di dapat, toko kosmetik atau online shop

Intinya sih dari penilaian di atas adalah elener pen ini sangat mudah digunakan, cocok buat pemula seperti aku. Dengan intensitas warna yang standar, membuat elener ini buildable banget, kamu bisa tentukan sendiri intensitasnya. Dengan harga IDR 30K, menurutku sih tingkat ketahanan terhadap air dan keringatnya udah bagus, cukup lah.

 Teman-teman ada yang udah pernah pakai?


IBB Makeup Challenge June 2014 with Silky Girl

Good day all!

My fifth submission for Indonesia Beauty Blogger Makeup Challenge, and I haven't won even once... yet. And moreover, this post was supposedly submitted two days ago... Well, whatever.

This month's makeup challenge is sponsored by SilkyGirl Cosmetics. Just a snap review, SilkyGirl is Malaysian cosmetic brand. Gitta Gutawa, an Indonesian best teen soprano, acted as their spoke person. I don't know in other country though.


Okay, back to the topic. The theme for this month is all about smokey eyes. And since I am still totally clueless what color to wear for a smokey eyes look, I'll just choose the safest ones, black and dark brown.

        
Pasang muka yg paling cakep dulu ahhh :D

For this look I use the classic technique of smokey eyes and an ombre lips style. Here are the tutorials. I have to tell you that the looks here are not exactly the same as in the tutorial boxes, as well as the products, but more or less I was using the same techniques.


Those two tutorials were originally posted on my previous posts here and here. I reposted again, because I'm such a nice person. LOLs.

And as for the face, I sculpted  my cheek bones, jaw line, forehead, and the nose, and added a bit of nude pink blush on the apple of the cheeks.

***

To be honest, making a 'pretty' makeup is such a challenging task, becoz gue orangnya sembrono dan kagak telaten. Jadi bisa dibilang, ini kerja keras bangeeet bikin blending yg beginian ya Allah.

Spam ya!

Hate my face here, I look like a hook*r

Teteeeep yeee biar mo gaya arab, hidung ga bisa boong huahahahaha

Sakit gigi heheheh. Agak burem akibat teknik yang kacau dalam memotret menggunakan timer kamera, maklum ga ada yg bantu motoin nih... hiks...


Products abused

  • Face
    • La Tulipe Cover Foundation (natural) as face foundation and hilighter
    • Maybelline Clear Smooth Face Powder (light)
    • NYX Single Eyeshadow (dark brown) as contouring
    • Coastal Scents 120 Pallet Eyeshadow 1 (pink) as blusher
  • Eyes
    • NYX Single Eyeshadow (black & dark brown)
    • EH Proof 10 Eyeliner Pen (black)
    • NYX Eyeshadow Base (matte white)
    • Unbranded Falsies
    • Baby Color Rainbow Softlenses (grey)
  • Lips
    • Beautystyle Lipstick (sweet earth)
    • NYX JEP (milk)


That's all for now, see you again :)


Wednesday, June 18, 2014

My Sexy Bloody Stitched Face

Hi, so this is what I look like today:

esybabsy.blogspot.com

I know it's still months before Helloween, but I can't stop myself from doing so. Maybe you can save this tutorial for the hext events. Alhamdulillah I don't have Hemophobia.

First of all, I'm gonna warn you that this is gonna be a pretty long tutorial. So let's begin!


esybabsy.blogspot.com

This step is optional
After doing your skin care and foundation routines, I draw my wounds outline using OPI Matte Top Coat to create deeper looking scars. If you use a glossy nail top coat, do that before applying foundation. Close your eyes while doing so.

P.s.: begitu top coat mengering dan diolesi eyeshadow, luka akan terlihat seperti koreng. (Iiih, jijik...).

While waiting for the top coat to dry, let's do other parts.


*****

THE RIGHT EYE


How to:
  1. Apply eyeshadow primer.
  2. Apply black eyeshadow around your eyes.
  3. Continue with bluish purple shade.
  4. Then a red eyeshadow as well.
  5. Blend the colors all together, and blacken your waterline and tight line.
  6. Draw your eyebrows. To match the blood color, I use a red lip liner to define them.


***

THE WOUNDS


Now the top coat have dried already, we can draw our wounds.


Using an angled brush and black eyeshadow, draw random lines on the parts you've outlined before.


Define them with a red lip pencil.


Using the same black eyeshadow and red lip pemcil, sketch some stitches. Don't be so neat lah yaaa.


***


THE LEFT EYE


Now for the other eye, you can go with any kind of style, but since I still wanna look 'sexy', I do this simple and sultry cut crease one. I actually made a tutorial about this. You can check it out here. But I changed the colors to light silver and dark silver. I also draw my eyebrow using a black pencil instead of brown.


***

THE LIPS


Now for the lips, I choose a dark vampy red color to strengthen the sexy aura. lols.


How to:
  1. Draw an outline using a red lip pencil.
  2. Fill your entire lips with the same lip pencil.
  3. Set it with a red lip color using lip brush.
  4. Dab a face powder using a brush and a tissue. This is to lengthen the staying power.
  5. Since I wanna achieve a vampy color, I mix some black eyeshadow using a lip brush. You don't have to do this if you already have that vampy red lipstick.
  6. You are done!


***

CONTOURING


Don't forget to contour your cheek bones and nose. But sadly I forgot to contour my nose, aarggh! 
Do the contouring with a pretty harsh shape to create an evil looking face.


***


THE BLOOD


Okay, so for the finishing touches, a.k.a. the blood itself, you ought to use a fake blood. Relly. But since I don't have one, I replace it with a food coloring instead. Much cheaper.... And much more delicious...

  1. Q-tips.
  2. Red Food Coloring (aroma pasta cap koepoe-koepoe, jenis santa merah).
  3. Cotton balls.


How to:


How to:
  1. Drip the food coloring using a q-tip on the wound lines. Let it drip. More drips, the better.
  2. Dab your cotton ball in a light motion to create messy effect.


All done!


***


FINAL LOOK


Tampak kanan


Tampak kiri


Tampak depan

Products abused:
  • Face
    • La Tulipe Cover Foundation (natural)
    • Revlon Photoready Concealer (light)
    • Maybelline Clear Smooth Powder (light)
    • Make Over Contour Kit
  • Eyes
    • Revlon Lip Liner (red) used as eyebrow pencil
    • Viva White Eyebrow Pencil (black)
    • Coastal Scents 120 Eyeshadow Palette Original 1
    • Mizzu EYeliner Pen (black)
    • Baby Color Rainbow Softlenses (grey)
    • Unbranded falsies
  • Lips
    • Revlon Lip Liner (red)
    • Viva White Face Painting (red)
    • Coastal Scents 120 Eyeshadow Palette Original 1
  • Wounds
    • Revlon Lip Pencil (red)
    • Coastal Scents 120 Eyeshadow Palette Original 1
    • Food Coloring (red)
    • OPI Matte Top Coat


Some useful tips:
  • I do the step orders according to my preference, you can adjust to your won. Maybe you prefer to do the eye first, or wound first. But drip the fake blood after putting all of your properties since it'd be quite a mess.
  • If you choose to apply a nail top coat for outlining the wound, it would be useless to remove it using a regular makeup remover afterwards. Use a nail polish remover instead. But be sure to close your eyes while doing so.
  • Use a face foundation one tone lighter than your natural skin tone would be a great option. Make sure your face is as flawless as possible.
  • You can lick the fake blood if you want, it's a food coloring anyway. ^___^


See you again Insha Allah!


Monday, June 16, 2014

Review: La Tulipe Cover Foundation (Natural)

Sebagai seorang yang mengaku meminati dunia kecantikan, harga diriku seringkali tertohok sangat dalam bilamana ada yang bertanya "foundation-nya pake apa?"

Karena aku cuma ada satu: Maybelline Dream Liquid Mousse.

Itu juga minjem punya sodara.

Jadi kesimpulannya, aku seorang beauty blogger yang gak punya foundie. Kasian? Enggak juga sih, lebih kasian lagi aku 6 bulan lalu sebelom punya beauty blog, cuma punya satu base makeup berupa BB Cream Ponds Age Miracle, yang mana saat itu aku nyangka BB Cream sama dengan krim anti aging. Parah.... >___< Mapp curhat dikit.

Maka untuk memperkaya koleksi base makeup-ku yang isinya cuma BB Cream dan CC Cream, aku memutuskan untuk beli foundationnya La Tulipe ini. Kenapa merk lokal? Hello, aku cuma emak-emak biasa, bukan orang kantoran, bukan MUA, jarang jalan keluar. Pake base makeup juga cuma buat latihan lenong, ngapain yang mahal? Baca-baca review b-blogger lokal, foundie ini yang coverage-nya paling bagus dengan harga yang terjangkau. Seperti apa benda ini begitu kupake? Mari kita cek performa-nya sodara-sodara.


Kemasannya, not much to say yah. Buat yang biasa liat brand ini, kotak dan jar plastiknya itu khas La Tulipe banget. Hampir semua produknya dikemas dalam kotak berwarna abu-abu itu. Sekilas mirip kotaknya Kryolan, ya gak sih? Ada beberapa tipe cream foundation yang diproduksi sama La Tulipe. Kalo gak salah soft foundation, cover foundation, dan cover foundation for oily skin. Aku pilih cover foundation. Kenapa ya? Mungkin kalo dilihat dari runutan namanya, foundie ini ada di tengah-tengah. Ngga ngerti? Ya udahlah...


Ada ekstra tutup plastik di dalamnya. Agak males sebenernya dengan tipe kosmetik yang harus colek-colek gini. Gak higienis dan liat deh, baru dicolek sekali aja udah keliatan messy and gross banget. Tapi sepertinya tekstur thick model gini pasti susah kalo mau dikemas dalam botol pump. Ada sedikit bau yang menurutku gak enak, mirip bau foundation jadul berbentuk kerang yang suka dipake nenekku dulu. Apa pula itu merknya... ah lupa.


Dan ini komposisi bahan plus logo Halal dari MUI. Shade yang aku pilih adalah NATURAL. Kalo kata SPG-nya sih yang shade Rachel buat kulit kuning, yang Natural buat yang kulit putih, Suntan dan Beige untuk yang berkulit gelap/sawo matang. Yah, walaupun aku gak ngerasa putih-putih banget sih, aku pilih yang Natural aja. Setidaknya paling mendekati.


Kalo banyak yang bilang ini foundie susah di blend, ternyata emang bener. Tekstur krimnya itu padat sekali. Perlu usaha dan waktu ekstra, juga sering latihan untuk bisa ngeblend ke muka biar keliatan rata. Otherwise, jatohnya bakalan kayak badut banget. Apalagi aku biasa pake BB Cream yang gampang banget di blend, gak sabaran juga sih pas pertama make ini.


Contoh di gambar atas adalah perbedaan wajahku ketika masih bare face, pake foundie, dan pas udah ditimpa bedak padat. Aku cuma ulas sekali dan itupun dikiiiit aja, di blend pake sponge, udah lumayan covered. Mata pandaku yang termasuk kelas berat juga tertutup! Hasilnya juga matte deh, jadi kalo nge blendnya rata, gak usah pake bedak lagi udah oke. 

Ngomongin soal shade-nya, yang NATURAL ini terlalu terang buat kulit wajahku. Kalo aku apply di muka, leher dan kuping jadi keliatan belang banget. Apalagi kalo udah ditimpa bedak, tambah keliatan lenong banget. Untungnya aku pake jilbab, jadi ga terlalu masalah. Tinggal bedakin aja tanganku biar gak kebanting ama muka, beres deh. Tapi aku rasa shade yang setingkat lebih terang gini cocok banget buat acara resmi kali ya.


Sekedar iseng pengen nyoba performance-nya di air. Dan emang bener dia waterproof. Jadi masih bisa lah dipake syuting sinetron yang adegannya hujan-hujanan sambil nangis. Tapi jangan digosok keras-keras. Dijamin hilang. Foto yang di kanan itu setelah kugosok dengan tenaga dan nafsu yang sedikit violent, kelihatan pudar kan walaupun masih sisa dikit.

***

So far I like this product, buat mukaku yg normal-oily, dia lumayan gak minyakan dan makes my face stay matte for a whole day. Disiram air wudhu masih oke lah. Di mukaku juga cocok, ga jerawatan, dan gak oxidize terutama di sekitar hidung.

Untuk mengimbangi shade-nya yang rada keputihan, aku campur dengan BB Cream Sariayu Fair White, sesekali dengan Maybelline Dream Liquid Mousse Foundation. Kenapa? Karena di antara base makeup-ku, dua produk itulah yang memiliki shade tergelap. Lumayan juga kalo dicampur, selain gak keputihan juga jadi lebih gampang di blend. Palng butuh usaha ekstra aja untuk mencampurnya di palet/tangan sebelum ditemplok ke muka. Tapi cara ini so pasti mengurangi tingkat staying power nya. Jangan lupa pake pelembab dan segala skin care routine kamu sebelum menggunakan foundie ini, otherwise bakal kelihatan dempul banget, alias cakey.

Sayangnya aku cuma pernh pake ini ke acara-acara santai, jadi belom pernah tahu hasilnya kalo diulas tebal buat kondangan. Hehehe. Mungkin temen-temen ada yang pernah pakai juga? Please share ^^

So far, here the verdicts:
  • Matte result
  • High Staying power
  • Perfect for oily skin
  • The shade NATURAL is too light for me
  • Hard to blend
  • Thick textured cream
  • Soft disturbing smell
  • Doesn't break out or oxidized, at least on me.
  • How much: IDR 25-30K approximately.


Latest Post

First Impression: Evershine Moringa Series