Monday, March 24, 2014

Tutorial: How I Draw My Eyebrows

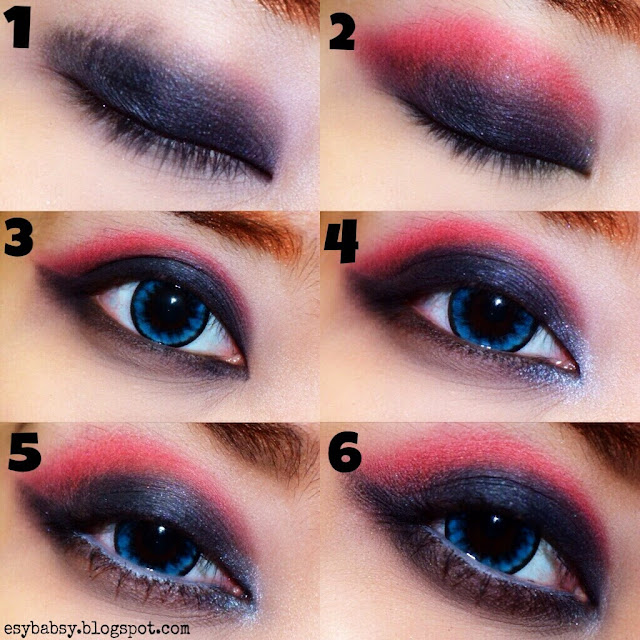
In most occassions, I llllove drawing eyes. This is how I do my eye sketch:


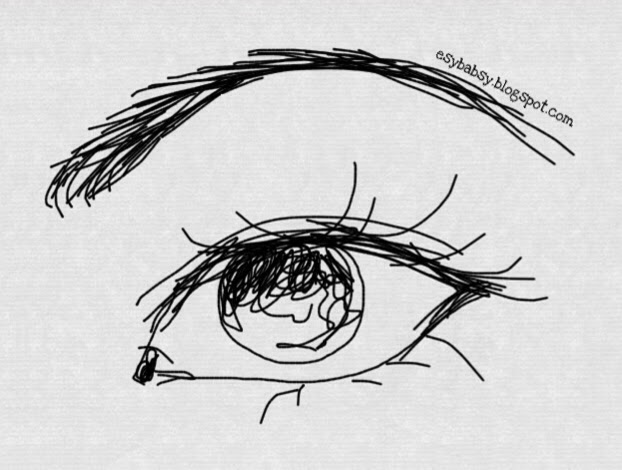
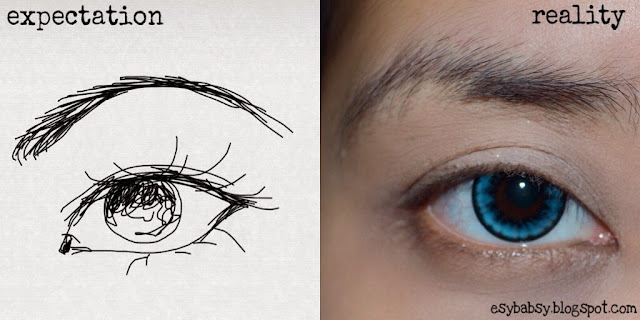
Dreamy, kinda? Heheh. Almond structured eye with curly long lashes and big eyeball, and especially: a perfectly arched eyebrow.

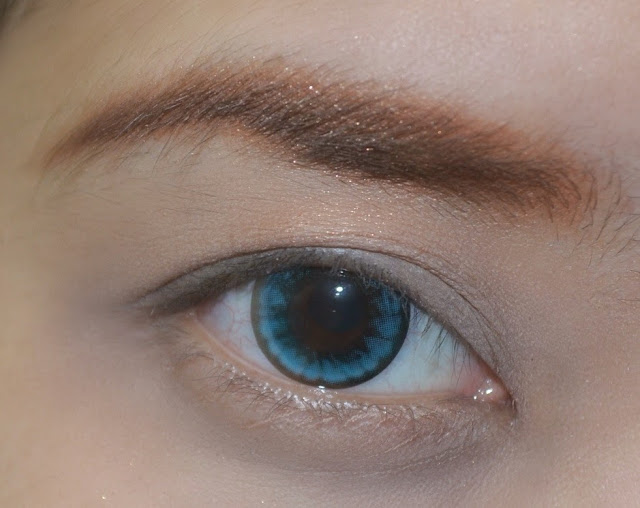
Most people say, you tend to imagine things you don't have. It's pretty much true. Because this is what my eyebrow actually look like:


Not a very flattering sight, huh? LOL. Except for the circle lens, everything you are witnessing now is a reality. You must thank me for trimming them, though. Because I was actually born with very thick and flat eyebrows, and... They were connected to each other. Aaargh...


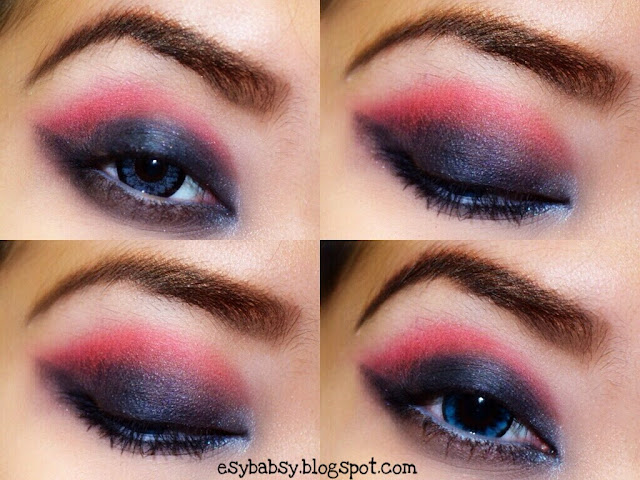
So far, this is probably what you have in mind: 


Okay, okay, enough with the creepiness. Let me show you how I do my tricks to camouflage them.

Here are the tools I use:
  • Etude House eyebrow drawer (light brown)
  • Inez loose eye shadow (aztec gold). Review here.
  • Viva eyebrow pencil (brown)


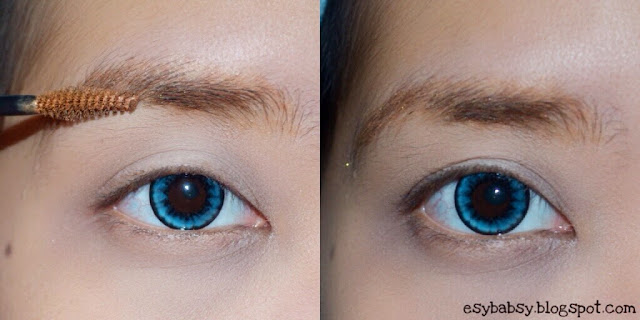
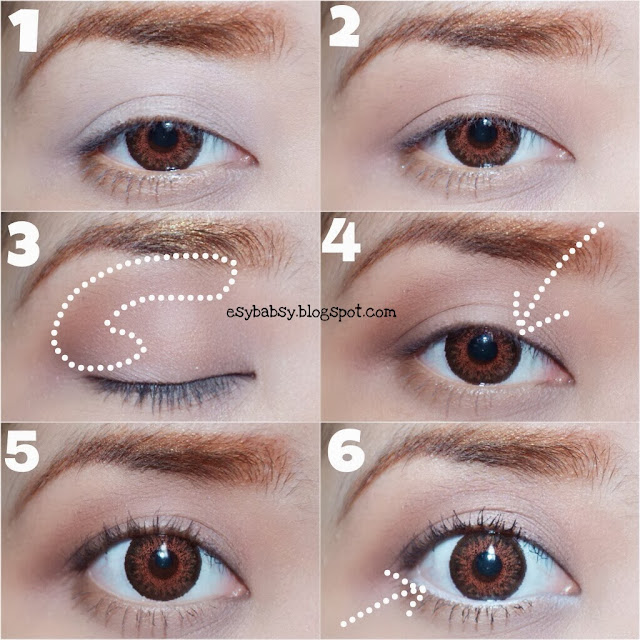
First, draw your eyebrow with eyebrow drawer on your whole eyebrow area. What I like about an eyebrow drawer is that it combs your eyebrow as well as coloring them.


Define the area you just draw with gold eyeshadow.


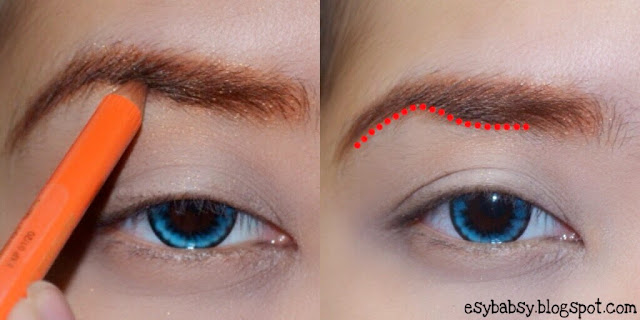
Draw the dotted line area with eyebrow pencil to make it more defined and looked more natural.
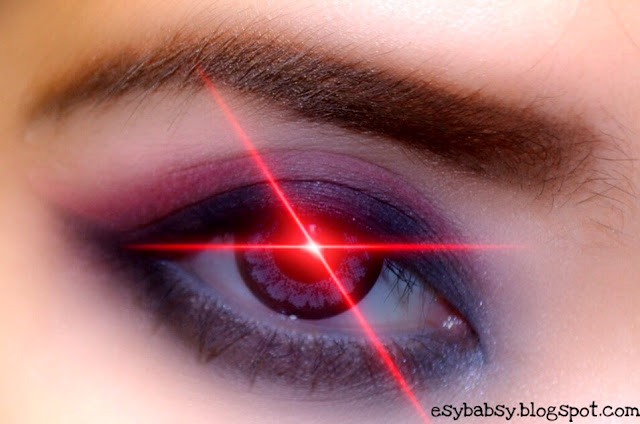
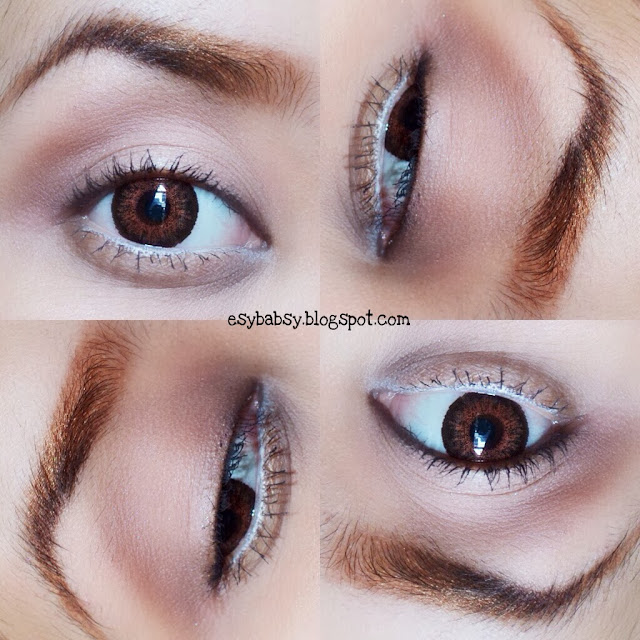
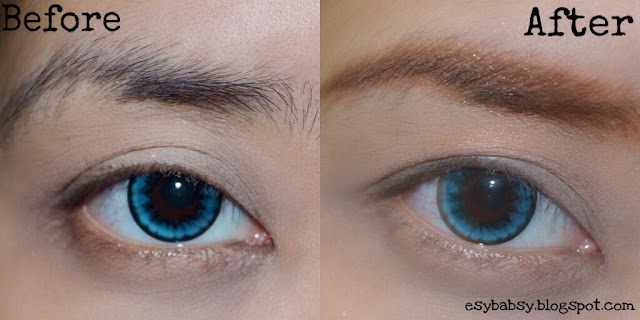

Final result.


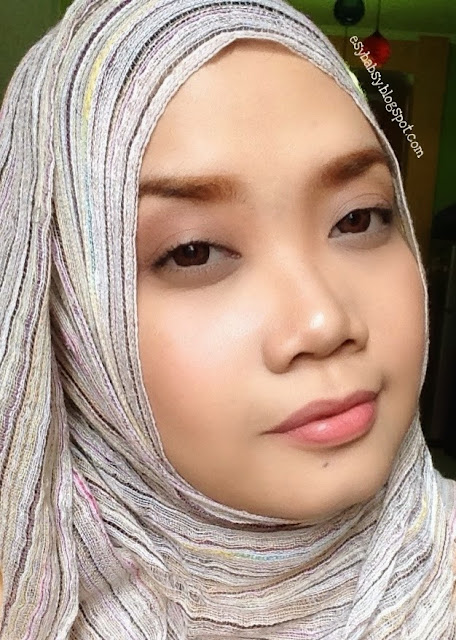
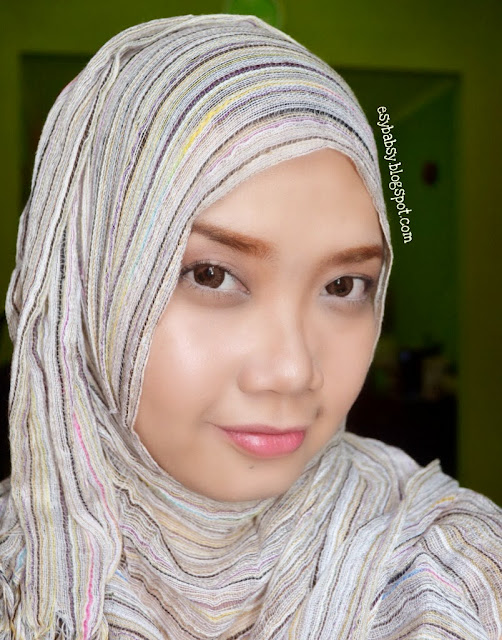
See the difference? At least now my reality is not too much far from my expectation, right? LOL.


Oh, here are a few tips from me:
  • The tools I use here comes in light shades, the result is somekind of light brown or strawberry blonde eyebrows. So, make sure to find suitable shades for your skin tone.
  • For darker complexion, you can use dark brown eyeshadow instead a gold one. Brown mascara is a great substitute if you do not have an eyebrow drawer.
  • Using powder eyeshadow is a bit tricky since the powder might fall on your eyelids. Use pressed ones instead. I use this shadow powder because the shade is similar to the etude eyebrow drawer. Once I found a pressed eyeshadow with similar color, I'd definitely move on.


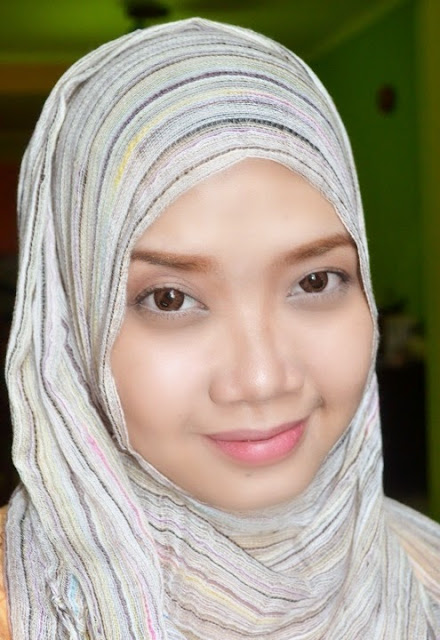
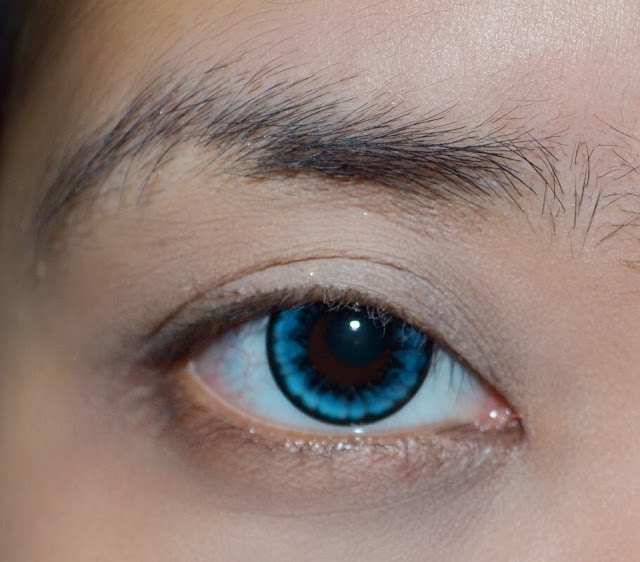
Actually this is the photo I submitted for IBB MUC March 2014, but the eyebrow shade I present here is pretty much like that. Link here.


Well, there are so many ways to draw your eyebrows. This is how I do it. How do you do it?

Artinya: 
Banyak jalan menuju roma. Kalau kamu mau ke roma, jalan mana yg kamu pilih? 
 
Hihihi. 
Mulai ngaco.

See you!


Friday, March 21, 2014

Tutorial: Simple Red & Black Eye Makeup

Red and black are aaalways good together. Let's see how they'd look on your eyes.

Please enjoy the tutorial!


First of all, start with clean eyes. Define your eyebrow and apply eyeshadow base. Then you can move on to these:

1. Apply black eyeshadow on all over upper eyelids.
2. Apply red color on your crease and V line. Blend.
3. Line your eyes with black eyeliner.
4. Put a little silver shade near your tear duct.
5. Line your lower waterline with white pencil and apply mascara.
6. Apply black eyeshadow on your lower lashbed then smudge.

All done, you crazy people!

Final result:


Full face view? Nah.. I don't think so. I was kinda lazy putting on my hijab.

Instead, I'll just give you this.


Haha! Good luck, girls... And boys!

Comments or suggestions are always welcum ^_^


Monday, March 17, 2014

Review: Lip Ice Sheer Color "Bubble Gum"

Back again to budget beauty review ^_^

Hey, I've been using this Lip Ice thing since college, and ever since then I've bought dozens (maybe a hundred) of it because this lovely pink thing has become one of my everyday makeup routine.

To be honest, Lip Ice variant had multiplied into numerous items which kinda confused me. Lip Ice this, Lip Ice that. I kinda lazy reading each one of its variant (I always buy this while doing my monthly expenditure: enpagrow, mamih pokoh, bimolih, kecap bango, rinsso, odol, etc), it would be too much hassle reading one by one. So I usually will just pick any item with a pink color >_<
 
Let's see what I just grabbed:
 
 
I think most girls are very familiar with this, but for some of you who don't know what Lip Ice is, well, basically it's a tinted lip balm.
 
According to the backside of the packaging:
Goes on clear, then, changes to a subtle shade of sheer pink
 
So, when you glide this on your lips, the color won't change, but after a few minutes your lips will change color into a nice sheer pink shade. Already familiar with bunny lipstick (the green lipstick with golden chinese letters which your relatives usually brought from Hajj?), well, it's more or less like that. LOL
 

Nothing changed much in the packaging since the very first time I bought it: Pink plastic glide-on tube with baby pink plastic cap. The stick inside is white with a sheer fragrance of bubble gum (for this variant).

 
The ingredients and directions of use:


The result:

My bare lips and after the application. Actually, it changed a lot pinker than that, I glided too much XD

I've been using this for more than 10 years, from the time when Maybelline lipstick is an enormous luxury for me, and spending IDR 25K for makeup is an insane useless improvidence (but I spent USD100 for Marilyn Manson hardcovered autobiography!). Okay, it's out of topic... 

So far, for the last 10 consecutive years, I love the effect on me. It really soften up my lips but also give a sheer pink shade. At least I won't look too pale, compared to the time when I wear my colorless petroleum jelly. I think, this product is suitbale when you don't want to show too much effort to look pretty. Hischoolers, hello... ^^
 
Verdicts:
  • Moisturize your lips
  • Sheer pink shade after a few minutes application
  • Matte result
  • Easy to apply compared to lipstick
  • Nice fragrance
  • Price: Less than IDR 20K (USD 2)
  • Low staying power (in colors and moisturizer effect)
  • Easy to get
  • Where? Drugstores, convenience stores, supermarkets, traditional markets, everywhere! XD

Repurchase?
Always. How about you darlings?


Thursday, March 13, 2014

IBB Make Up Challenge March 2014 "Natural Glow"

Yay! Another makeup challenge! You know what I like about blog challenge? It's not the competition itself, but it gives me the idea of my next blog article. LOL.

This March 2014, Indonesian Beauty Blogger community, sponsored by Menard, presents another makeup challenge with the theme: natural glow.

Here's the banner. You can read further info on IBB official site.


It's not very hard to find the idea of natural makeup, because that's the look I always do everyday. It's almost like 'no makeup' makeup. The key for this look, besides using the shades similar to your flesh tones, is: by not applying eyeliner on your eyelids.

Let's check out the tutorial, it's very simple.


  1. Define your eyebrow and apply eyeshadow base on all over your upper eyelids.
  2. Apply flesh tone eyeshadow on all over upper eyelids.
  3. Cut your crease using dark brown eyeshadow.
  4. Line your upper waterline with waterproof eyeliner pencil. Remember, your upper waterline only!
  5. Curl your lashes and apply black mascara on your lower and upper eyelashes.
  6. Line your lower waterline with white pencil.


For the face:
Contour your nose, apply blusher and highlight (I use Etude House nymph aura volumizer) on your cheek, then apply pink tinted lip balm/gloss (I use Lip Ice in pink).

And you are done! It's as simple as that!
Oh, actually you can skip the step #2 which I usually did. So basically I just need one eyeshadow: dark brown.


Final look:


See how a single smile can really change a person's face shape? LOL


Why did I choose all the same three angles? Boring....


And by the way, I was listed as the top 5 finalists on IBB MUC last month. Sheesh... The only look I submitted XD


Kindly spare your precious time to vote, yaaaa. Vote for me... Errr I mean, your favorite! Hahahah. 


Have you submitted your masterpiece for this month challenge? Well, what are you waiting for?! Go create one already! You can submit up to three looks!

See you then! ^_____^


Tuesday, March 11, 2014

Review: Sariayu Marshmallow Creamy Blush On

I was looking for a cream blusher when I found out that Sariayu--a local Indonesian cosmetic line--just launched one in 2014. I was eager to try it out. Let's say, if your local brand has it, why try others?


Because I'm lazy to go outside, I bought it from its official online store which costed me around IDR 50K (USD 5). And that blusher arrived inside this beautifully painted white box:


First I thought, whoa, the box is pretty bulky.

But when I opened it, I was like... say whaaaaat?  
 
The treasure hidden inside that beautiful white box was a super duper mini tiny plastic transparent jar which I pressumed as the blusher itself.
 
 
The jar somehow reminds me of The Body Shop lip balm series, so I took it as a comparison to show you how tiny this blusher is. TBS lip balm even has more generous content. 6gr vs 8.5 gr.


The ingredients:


This texture is pretty solid for a cream blusher.


It only comes in one shade, thus I would assume this reddish orangey shade is suitable for any kinds of skin tone. No weird smell, in case you're wondering.

Here's the swatch on my inner hand which has similar skin tone with my cheek.
 
Above picture is a raw swatch and below is after I blend it. It's not the pinkish shade you look for, more of a pretty red/orange shade that's suitable for most Indonesian complexion.
 
I've been using this for about a month, and the staying power is actually pretty good compared to my Revlon powder blush. I would suggest you to apply this between foundation and face powder application for a matte result. Or apply this after foundation without face powder for glowy result.
 
The formula is like this:
  • Foundation/BB Cream - blusher - face powder => matte result
  • Foundation/BB cream - blusher => glowy result
 
 
Okay, move on to verdicts:
  • Super tiny content (only 6 gr)
  • So the price of IDR 50K is a bit pricey for me
  • No weird smell. Instead, it has no smell at all
  • Solid cream formula
  • Matte result
  • Reddish/orangey shade
  • Medium staying power
 
That's all for now. Anyone tried this cream blusher before? Please tell me what you think. Until then! ^_____^


Saturday, March 8, 2014

Review: Maybelline Hyperglossy Liquid Liner - Tangerine

In reality, black or brown eyeliner is enough. You can always replace multi colored eyeliner with applying eyeshadow with a wet angled brush. But it's such a hassle, and a real eyeliner, will definitely look different than an eyeshadow.
 
So I give this a shot. The infamous Maybelline multi color liquid liner.


Mine is Tangerine, or orange.
 
 
The brush tip is quite pointy, so far I like it. But the handle is too narrow for me.

 
This is what the color will look like on your eyelids. Ignore the mess, pretty please? It is very.... Orange. And it's glossy.
 
Some amount will stain your eyelashes if you're not carefull enough, like me. Just cover it with mascara. You don't wanna look like having orange eyelashes, or do you?


Okay, let's test its waterproof performance.

 
The formula is glossy and a bit shimmering.


Run it with tap water. Still look amazing.


I rub it with my hand softly. Some lines were peeled off.


This is after I rubbed it violently. Hehehe. It turned to small flakes.

I have been using this product for about two months, but unfortunately, due to its funky effect, I can only wear this on special occassions, not everyday. On those times, I went out approximately for 5-6 hours and the orange lines stays quite well the whole time, if you don't rub them of course (no eyeliner can stand strong if you rub it!). And it doesn't stain my lower eyelids, maybe because its flaky effect when you rub it. FYI, I have very oily eyelids.

 One thing I gotta warn you that this liner kinda gimme a sting sensation, I don't know whether some of you might experience the same thing with me, or not, but it surely does sting. But only on first attempt and will fade after quite some time.

So far I like bright colored eyeliner since I have racoon eyes, at least it eliminates the chance of having more dark circles like the effect you get when wearing black or brown eyeliners. Yeah, I guess I just found one trick for that problem XD.
  

Conclusion:
Waterproof
Smudgeproof
Bright orange, creates funky look
Glossy effect
Stings my eyes
Pointy brush but for me the tip is too soft
Price: around IDR 40K (USD 4)

Repurchase?
Noooo, it's just for an experiment. There are tons of multi colored eyeliners and I'd like to try them all.

How about you? Have your tried this eyeliner series, if so, in what color?

Thanks for reading.


Ps: written based on my own experience. Results may vary to each individual.


DIY: How to Move Your Dead Lipstick into a Coffin

When you buy a lipstick, you hafta make sure it's not broken or expired yet before leaving the counter or you'll end up regretting it.

That was happened to me a few days ago, leaving the cash register immediately and headed back home without rechecking what I just purchased. I put that lipstick in my drawer immediately for a few days and just found out the stick was broken days later when I unwrapped it. 

So this what was actually happened:


And when I flipped the tube, the stick fell out.

Turned out the stick was broken to its bottom. LOL.
Did I feel sorry? Errrr.... not really. It wasn't an expensive one. And I felt lazy to claim the seller. It was not a severe damage, at least for me.

So I changed it into this:


Well, some of you might already familiar with this DIY process, but I pressume some of you might not yet. So lemme show you.


You're gonna need:
  • A metal spoon
  • A spatula (a cosmetic spatula would be better instead of cooking utensil. LOL)
  • A coffin container
  • A lighter
  • A candle
How to do it:

  1. You might want to soak your container, spatula, and the spoon in a hot water. Not a boiled one since the plastic tools will melt. But hot enough to clean them. Or just wash them thoroughly with soap. Whichever.
  2. Take your lipstick using the spatula out of its tube. Up to the bottom. And put it on the spoon.
  3. Warm them on the lighted candle until the lipstick melt.
  4. When 3/4 part of your lipstick is melted, lift your spoon and leave the rest of the stick melt on its own. You don't wanna burn it since it will change the formula.
  5. Pour it into the container using the spatula. Do it quickly or the lipstick might get solid again. If this happen, don't worry. Just warm the spoon again slowly.
  6. Leave it rest in peace in the fridge for a couple of minutes.
  7. Take it out once it regains its consciousness.
  8. Close the cap. And now your dead lipstick is alive again. In its coffin. Yeay!


Lookee, my lipstick have come back from the after life! Does she look pretty healthy... for a Zombie?


p.s.: comments or suggestions are always welcome. Smooch!


Latest Post

First Impression: Evershine Moringa Series