Thursday, May 22, 2014

Rafflesia Arnoldii


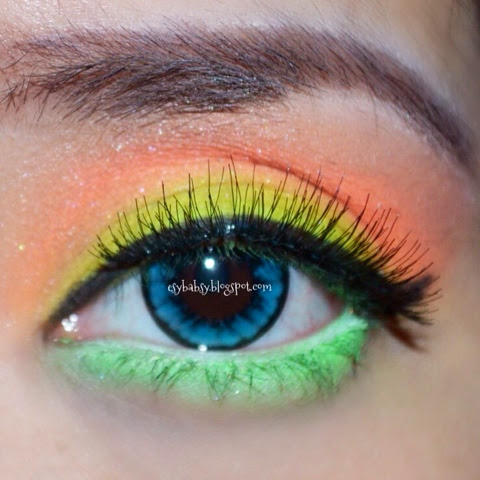
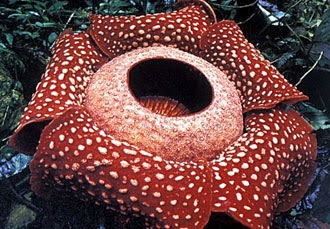
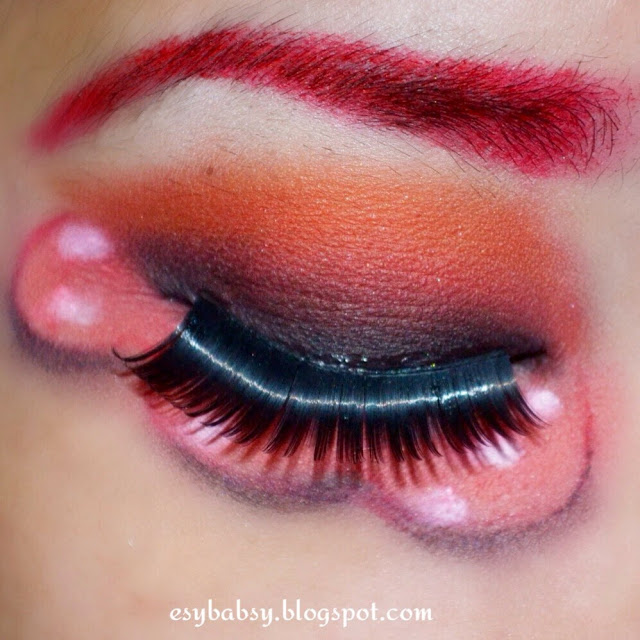
I made this trial to answer one of my mini collaboration challenge with other Indonesian Beauty Bloggers by creating a themed EOTD for a week. This one belonged to Tuesday theme: Rafflesia Arnoldii.

It kinda gross me out remembering this parasyte that has the odor like a dead body, and what kind of look I can create based on this?

I guess this was the best I did in my imagination.
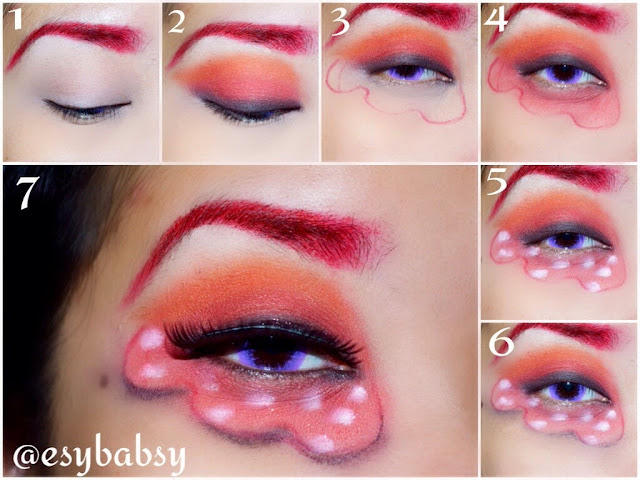
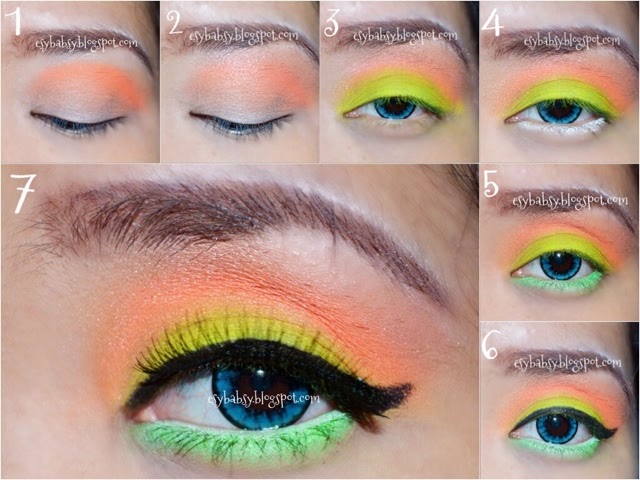

Here's how:
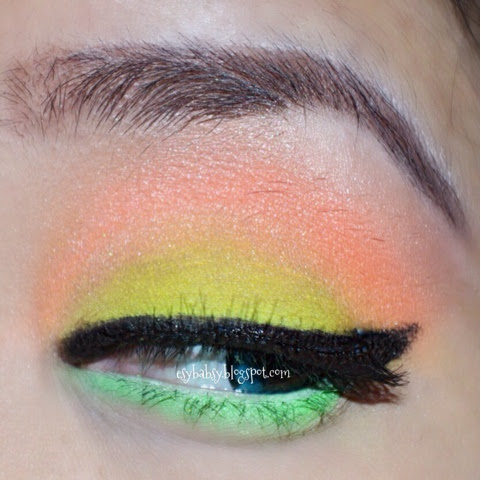
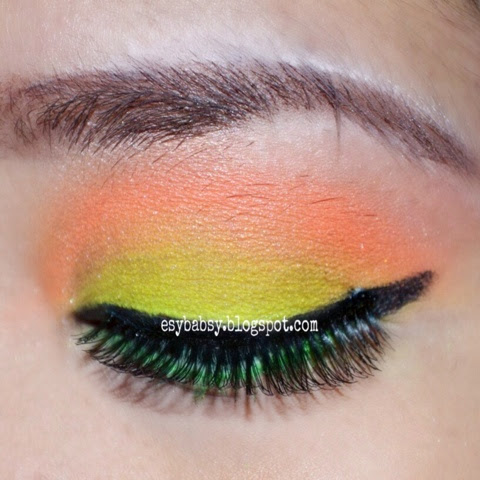
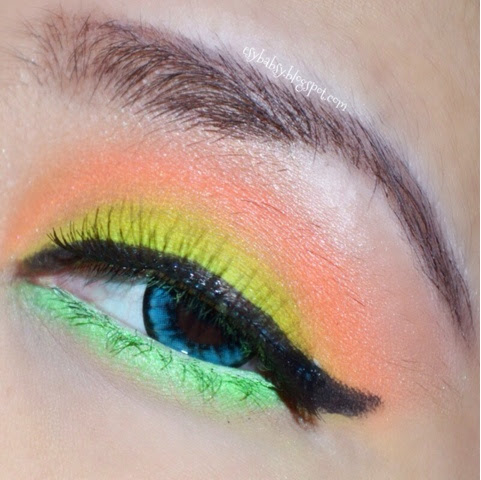
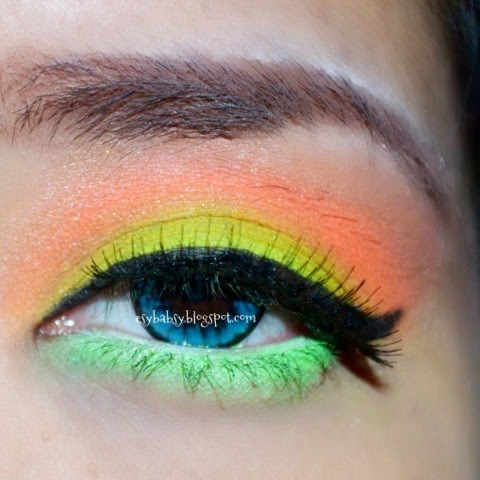
  1. Using red lip pencil, draw your eyebrows and apply eye primer.
  2. Apply black, coral red, and carrot shade on your upper eyelids. Blend.
  3. Using lip pencil daw a raw line to create a flower shape, try to connect the line with eyeshadow above.
  4. Fill it with coral eyeshadow.
  5. Using white pencil, draw white dots then top it with white eyeshadow using a pointy sponge brush.
  6. Using black pencil, draw black shadow to create 3D effect, then smudge.
  7. Draw black eyeliner, apply mascara, and the falsies.


The abused tools:
  • Revlon Lip Liner (Red)
  • Coastal Scents eyeshadow 120 color pallette (black, coral, carrot, white)
  • NYX Retractable Eyelner (white)
  • NYX Eyeshadow Base (matte white)
  • Artistry Automatic Eyeliner Pen (black)
  • Maybelline The Falsies Mascara (black)
  • Princess Mint Softlens (purple)
  • Koji Eyelashes Glue (clear)
  • Unbranded falsies


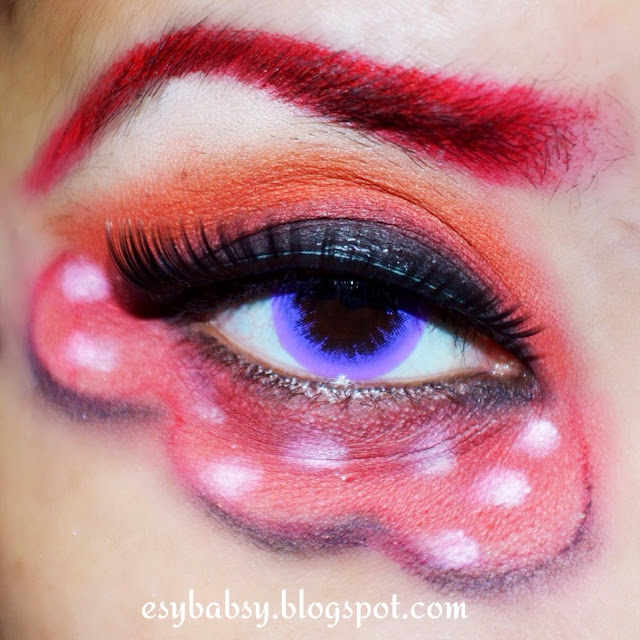
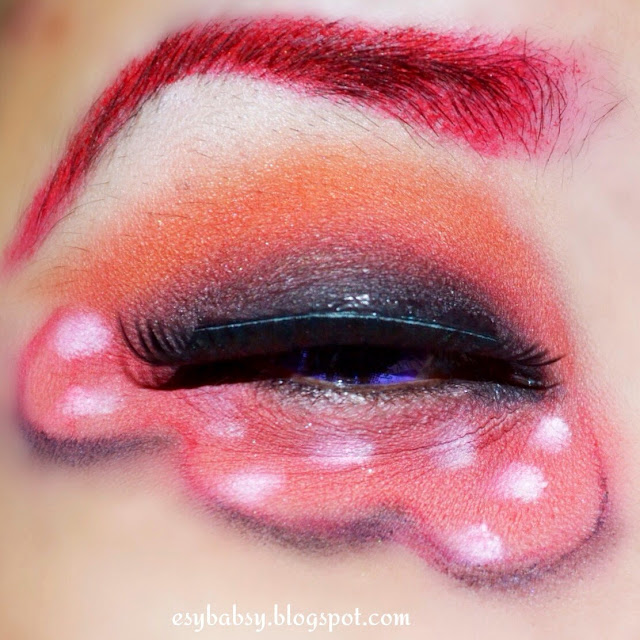
Of all the parts I draw that day, the eyebrow was my favorite one. Wish I can wear that outside.

Oh, well. See you again. Smooch!


Tuesday, May 20, 2014

Gender Bender

I wanna play with my face today and creating something what I thought as a man's face. And after contouring here and there, these are the results.


I took off that annoying lip ring.

Rai ne mas mas tenan yo... 

After I wiped off that itchy beard!

Too bad I didn't get the chance to make the pictorial since I was totally clueless what to do on the first place, but more or less these are what I did to create this look:
  1. Contour your cheek bone and forehead. Blend.
  2. Contour your nose, eyelids, eye bags, and laugh line. Blend.
  3. Draw your eyebrow with brown pencil and top it with brown eyeshadow. Exagerate the line to create bushy eyebrows.
  4. Using black mascara, draw your moustache or beard on wanted area.
  5. Wear boyish procs like sunglasses, face piercings, wigs, or a beanie hat, etc, and pose!


The tools:
  • NYX single eyeshadow in Brown (as contouring)
  • Maybelline Dream Liquid Mousse Foundation in Natural
  • Maybelline Clear Smooth Cake Powder in Light
  • Silky Girl eyebrow pencil in Brown
  • Maybelline The Falsies Mascara in Black (to draw beard)

The wigs, I really need to have a boyish wig by the way. I'll redo this makeup play and post a better result.

See ya!


Saturday, May 17, 2014

Tutorial: Nude Ombre Lips

Looking back the tutorials I've made recently were all about neon colors or dark shade. I think I'm gonna do something about nude colors. Let's start with my lips first. Then maybe, if I had the time, and the mood, I will try making a nude eye makeup (because I'm soooo into bright colors!).

This is what we're talking about.


Although it's nude, it's pretty sultry when you wear this style on your everyday activities. Kinda adult look. Okay, let's play with your lips!


How to:
  1. Moisturize your lips.
  2. Outline your lips using brown pencil. You can use eyeliner if you don't have a lipliner. Exagerate the line a bit more to create big lips illussion.
  3. Fill your lips with nude brown lipstick.
  4. Apply white creamy eyeshadow on your inner lips.
  5. Pout several times to blend the color.
  6. Retouch all the colors using lip brush and pout more to achieve a gradient shade. And you are done!


Spamming time!


Abused tools:
  • Silky Girl eyeliner (brown)
  • Revlon Plump Sexxxxy Lipstick (Sensual/003)
  • NYX Jumbo Eye Pencil (Milk)


Is the look nude enough?


Friday, May 16, 2014

Very Inspiring Blogger Award

Morning (it is now morning, at least)!

Untuk kesekian kali nya aku dapet award lagi. Yeay, seneng deh. Berarti blog aku ada yang baca, dan ada temen-temen yang menginspirasiku di dunia yang aku cinta ini. Taelah...


Kali ini yang nominasiin aku tidak lain tidak bukan adalah Shinta from shintalauraswa.blogspot.com. I knew her on my beginning days as a beauty blogger and knowing such a familiar and friendly girl like her did really motivate me to write more and even better. Can I nominate this back to you, Shinta?

Orright, these are the rules for this award:

  1. Link the person who moninated you.
  2. List and display the rules.
  3. Share seven facts about yourself.
  4. Nominate other blogs and let them know they have been nominated.


And now, these are the blogs I find inspiring for me:


And here are some facts about me:

  1. I was born on May 18, 1981 as the first child of two girls. My little sister is a more grown up person, though. 
  2. I'm not a very good writter nor drawer, but I do love coloring.So maybe you'll find my posts are not very endearing ones regarding their words.
  3. I used to have waist-length hair and cut it to Pixie hair in a day. When I was back to work the next day, everyone in the room was stoned and stared at me. It was quite a ruckus, and a pretty queer experience for me.
  4. I love studying English, corresponding with snail letters, collecting stamps all over the world, and collecting Mangas.
  5. In my rebellious days as a teen, I used to pierce my ears and lips, wearing all black, and listening to death metals. But I did grew up, okay :D I'm much much calmer now.
  6. I once diagnozed as kurang gizi by a doctor, because I barely ate and spent most of my pocket money collecting Marilyn Manson and Sailor Moon stuff.
  7. Adore Japanese modern sub-cultures.
That's all for now. Thanks for reading!

Thursday, May 15, 2014

Playing With My Blue Nails

Hello my fellow readers,

Today I'm gonna do something different. No, I don't wanna review any product nor showing some tutorial.

Just wanna show you my nails I did the other day. The Face Shop nail polish I present on the pictures is not meant to be reviewed, but I just wanna show you the product and the shade I use for this look. 

Also, I topped the color with my OPI Matte Top Coat which I reviewed last month here. The 'before' coating result was a bit darker and shinny, too bad I forgot to capture them! And after applying OPI Matte Top Coat, it turned to a lighter metallic blue, and of course, matte.

So enjoy these picture spamming!


Love love the blue!

See you again!


Tuesday, May 13, 2014

Tutorial: Sunrise Over The Green Meadow

When I was browsing through the internet looking for a new colorful wallpaper to brighten up my laptop, I stumbled upon this fun colorful picture. It's like a dream place, eh? A bright orange sunrise over the green meadow. Then my mindset suddenly connected it with my eyeshadow palettes and a little EOTD.


Check out this tutorial if you wanna make your eyes as bright as the sunrise. Definitely a summer eye makeup!


  1. After drawing your eyebrows and priming your eyelids, draw a bright orange line from your tear duct up to the outter V.
  2. Blend it with a lighter shade of orange on the brow bone to give a 3D effect.
  3. Fill your upper lids with a bright yellow tone.
  4. Line your lash bed with white pencil.
  5. Top it with a light green shade.
  6. Fill your waterline with white pencil, and line your upper lashes with black eyeliner.
  7. Apply fake eyelashes (optional) and mascara (which I forgot to wear, that's why my under lashes stay green LOL)

Final look and picture spamming time!


Don't mind the mess please? I used very bad eyelashes glue that wouldn't seem to dry up even after a few minutes. So you might see some white stain on my lashes. :(

Credits:
  • NYX eyeshadow base (matte white)
  • Sleek iDivine Acid Palette (bright orange, yellow, and green)
  • LA Colors 16 colors eyeshadow palette (light orange)
  • NYX retractable eyeliner (white)
  • Mizzu eyeliner pen (black)
  • Itsdiva falsies
  • X2 Bio softlenses (blue)
  • Silky Girl eyebrow pencil (brown)
See you again!


Monday, May 12, 2014

Review: Silky Girl Pop Soda Lip Jelly (Strawberry Pop/03)

This is actually part of my last April Haul. I've been waiting for the right time to use this lip balm since I don't wanna open the plastic and hurt the cute bullet. But, WTH.

The tube is actually upside down in this picture since I wanna show you the strawberry sticker. This is what this product will look like in the counters. The sticker shape depends on the fruit fragrance of each variant. But I forgot how many of them.


Mine is strawberry. I wish there was a banana fragrance.

When you removed all the plastic and that strawberry sticker, this is the real packaging of this product. Some of you might find it not very endearing, but I think the silver tube and that clear plastic cap is very futuristic looking and I love it. And because of my sloppy hand, the ingredients printed on the plastic was ripped apart. It was my hand's fault, not mine.

The transparent bullet. It really looks tempting and smells like strawberry. But it's actually bitter when I tasted my lips, curious as usual. The fragrance somehow reminds me of that strawberry flavored Fox's hard candy.

It's kinda hard taking pictures of the bullet in detail. Here are the best I could do. With and without camera flash. OMG, can I chop it with my teeth?

The result on my lips. 

According the directions of use in the sticker, you gotta wait until 30 seconds after 2 layer applications before your lips changed color, but this is the best result I achieved. It was so sheer that they looked slightly no difference at all. Even my Lip Ice Sheer color produce deeper color than this.

Its moisturizer effect is quite okay at its first hour only. After that, the formula felt a bit 'tacky' and dried my lips, so I had to reapply it. I think until now, no other lip balm can beat my Vaseline Petroleum Jelly--which is not travel friendly thanks to its bulky packaging. Maybe I will still bring this when I go out.

Verdicts:
  • Sleek tube
  • Cute transparent bullet
  • Nice strawberry smell, for this variant.
  • Not very moisturizing
  • Very sheer color, almost like no color at all
  • For a Silky Girl product, it's quite expensive
  • How much: around IDR 60K (USD 6)
  • Where: drugstores. Although this one's kinda rare, so happy hunting! ^_^


Will I buy it again? 
No. I think its cuteness and the nice fragrance are the only benefits I could get. There are many better qualified products with lower price :(

Note: Verdicts are based on my own experience. Results may vary.


Latest Post

First Impression: Evershine Moringa Series