Saturday, March 8, 2014

Review: Maybelline Hyperglossy Liquid Liner - Tangerine

In reality, black or brown eyeliner is enough. You can always replace multi colored eyeliner with applying eyeshadow with a wet angled brush. But it's such a hassle, and a real eyeliner, will definitely look different than an eyeshadow.
 
So I give this a shot. The infamous Maybelline multi color liquid liner.


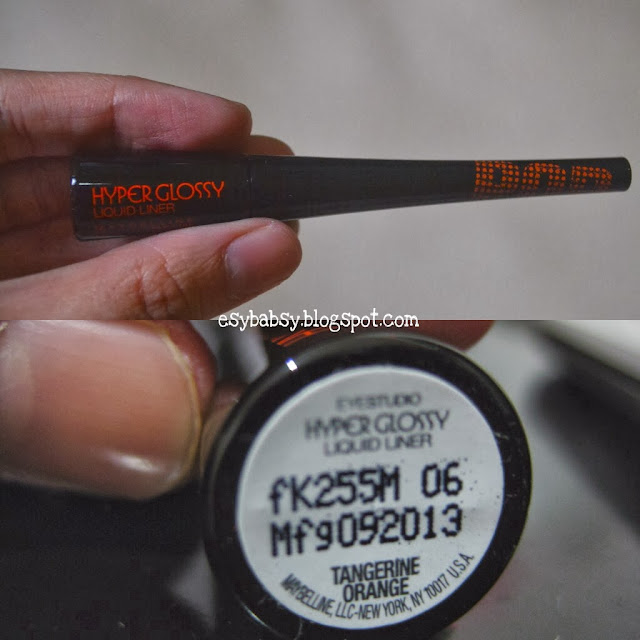
Mine is Tangerine, or orange.
 
 
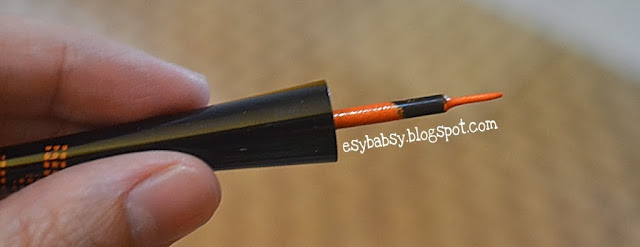
The brush tip is quite pointy, so far I like it. But the handle is too narrow for me.

 
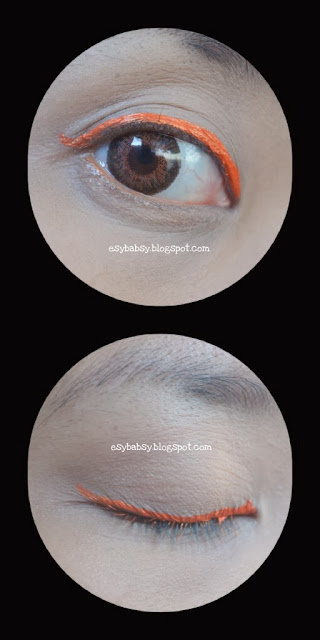
This is what the color will look like on your eyelids. Ignore the mess, pretty please? It is very.... Orange. And it's glossy.
 
Some amount will stain your eyelashes if you're not carefull enough, like me. Just cover it with mascara. You don't wanna look like having orange eyelashes, or do you?


Okay, let's test its waterproof performance.

 
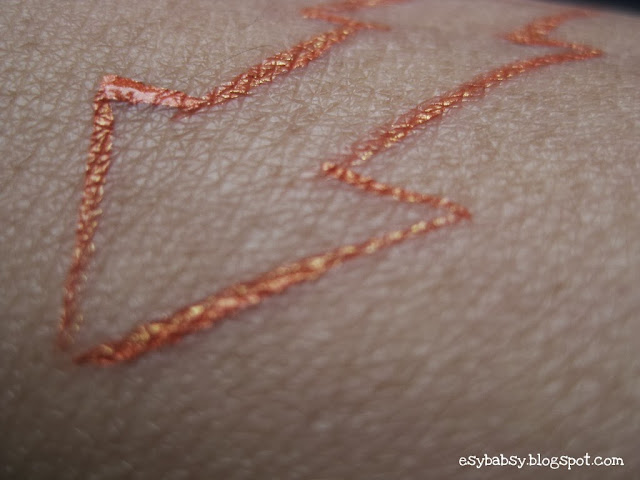
The formula is glossy and a bit shimmering.


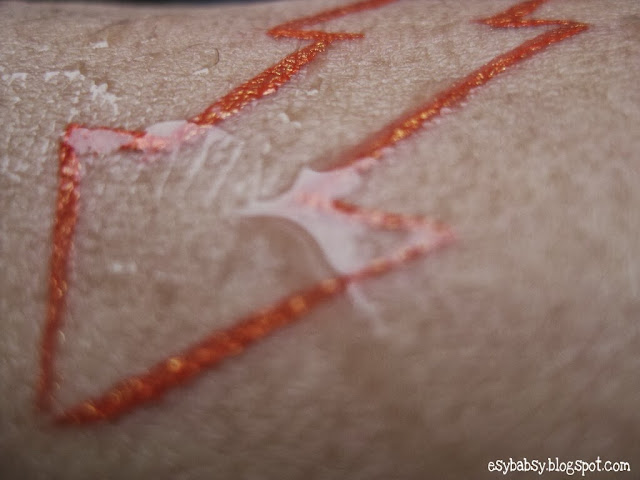
Run it with tap water. Still look amazing.


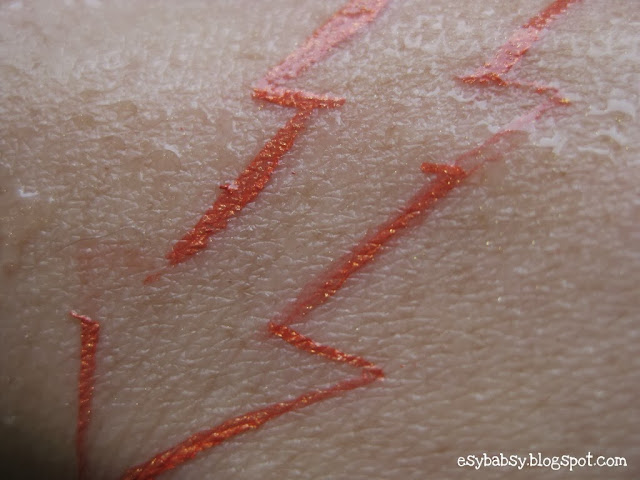
I rub it with my hand softly. Some lines were peeled off.


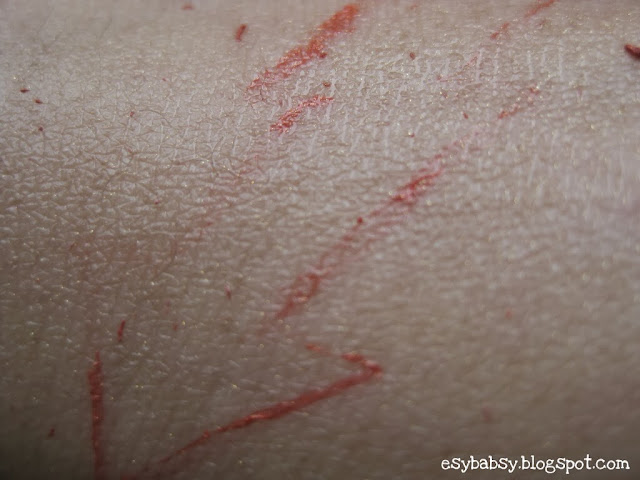
This is after I rubbed it violently. Hehehe. It turned to small flakes.

I have been using this product for about two months, but unfortunately, due to its funky effect, I can only wear this on special occassions, not everyday. On those times, I went out approximately for 5-6 hours and the orange lines stays quite well the whole time, if you don't rub them of course (no eyeliner can stand strong if you rub it!). And it doesn't stain my lower eyelids, maybe because its flaky effect when you rub it. FYI, I have very oily eyelids.

 One thing I gotta warn you that this liner kinda gimme a sting sensation, I don't know whether some of you might experience the same thing with me, or not, but it surely does sting. But only on first attempt and will fade after quite some time.

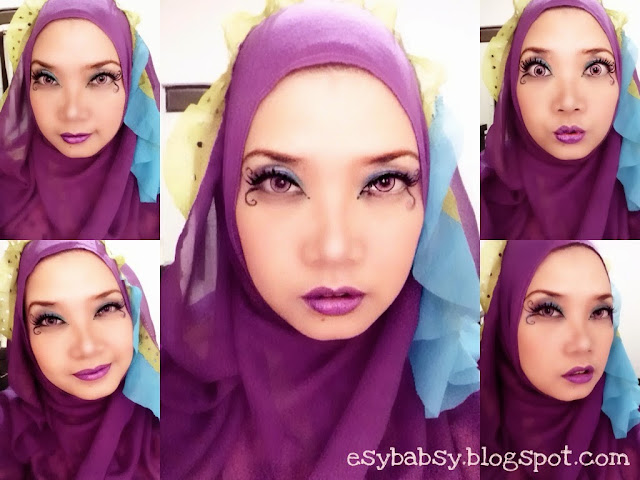
So far I like bright colored eyeliner since I have racoon eyes, at least it eliminates the chance of having more dark circles like the effect you get when wearing black or brown eyeliners. Yeah, I guess I just found one trick for that problem XD.
  

Conclusion:
Waterproof
Smudgeproof
Bright orange, creates funky look
Glossy effect
Stings my eyes
Pointy brush but for me the tip is too soft
Price: around IDR 40K (USD 4)

Repurchase?
Noooo, it's just for an experiment. There are tons of multi colored eyeliners and I'd like to try them all.

How about you? Have your tried this eyeliner series, if so, in what color?

Thanks for reading.


Ps: written based on my own experience. Results may vary to each individual.


DIY: How to Move Your Dead Lipstick into a Coffin

When you buy a lipstick, you hafta make sure it's not broken or expired yet before leaving the counter or you'll end up regretting it.

That was happened to me a few days ago, leaving the cash register immediately and headed back home without rechecking what I just purchased. I put that lipstick in my drawer immediately for a few days and just found out the stick was broken days later when I unwrapped it. 

So this what was actually happened:


And when I flipped the tube, the stick fell out.

Turned out the stick was broken to its bottom. LOL.
Did I feel sorry? Errrr.... not really. It wasn't an expensive one. And I felt lazy to claim the seller. It was not a severe damage, at least for me.

So I changed it into this:


Well, some of you might already familiar with this DIY process, but I pressume some of you might not yet. So lemme show you.


You're gonna need:
  • A metal spoon
  • A spatula (a cosmetic spatula would be better instead of cooking utensil. LOL)
  • A coffin container
  • A lighter
  • A candle
How to do it:

  1. You might want to soak your container, spatula, and the spoon in a hot water. Not a boiled one since the plastic tools will melt. But hot enough to clean them. Or just wash them thoroughly with soap. Whichever.
  2. Take your lipstick using the spatula out of its tube. Up to the bottom. And put it on the spoon.
  3. Warm them on the lighted candle until the lipstick melt.
  4. When 3/4 part of your lipstick is melted, lift your spoon and leave the rest of the stick melt on its own. You don't wanna burn it since it will change the formula.
  5. Pour it into the container using the spatula. Do it quickly or the lipstick might get solid again. If this happen, don't worry. Just warm the spoon again slowly.
  6. Leave it rest in peace in the fridge for a couple of minutes.
  7. Take it out once it regains its consciousness.
  8. Close the cap. And now your dead lipstick is alive again. In its coffin. Yeay!


Lookee, my lipstick have come back from the after life! Does she look pretty healthy... for a Zombie?


p.s.: comments or suggestions are always welcome. Smooch!


Thursday, March 6, 2014

Review: NYX Soft Matte Lip Cream - Istanbul

I've been keeping an eye for this matte lip color for quite some time before deciding to own it.
 
Udah lama naksir ama yg ini, akhirnya gue punya jugaaaa...!


The best thing from the bottle is the cap, it felt velvety and smooth. I love touching it. ^_____^
 
Tutup botolnya halus banget, dop dop gimanaaa gitu, kayak beludru. Tapi ngapain juga ya tutupnya gue bahas?

 
This series have tons of beautiful color. It was quite a hassle to choose the right one since some of them comes in similar shades. I aimed for a pale pink one. And after a long quarel between choosing Tokyo or Istanbul, so I finally decided to buy the last one since Tokyo is too pale, I think it suits caucasian lip color better. While Istanbul is similar to natural pink lip tone.
 
Sebenernya gue udah lama mikir mau beli yang Tokyo atau Istanbul, tapi akhirnya gue beli yg Istanbul aja kali yaaaa, secara Tokyo itu pucet banget, lebih cuco buat bibir bule yg rata2 emang udeh pink alami. Lagian seri lipstik ini warnanya banyak yg mirip. Kalo beli di online dan nasib lo lagi apes, bisa2 salah dapet warna. Hehehehe


These are the swatches which I took under natural lighting and indoor lighting. How can they be so different? The content comes in a condensed thick liquid with an alluring aroma of coffee and milk. I had a good time smelling it.
 
Ini swatch nya di indoor dan outdoor. Baunya enak, kayak kopi susu.


Unfortunately I forgot to take my bare lips for your reference. So I just took my old photograph which I copied from my old article. Here it is:

Warna asli bibir gue, kayak gini:


Aaaannd, here's the color when applied to my lips, with both lighting as well:

Dan setelah ditampol pake lip color ini, hasilnya jadi begini nih:


And, voila, this is exactly the result I want: matte nude lips. I had a pretty good time doing my cullinary trip in outdoors and the lipstick just stayed where they should be. A little suggestion, you might wanna dab a bit gloss to your lips for a more natural looking lips.
 
 
Demen! Warna bibir banget. Tu ari gue berasa cakepan. Hasilnya matte abis tapi ga bikin bibir kering walaupun aslinya bibir gue gampang kering. Staying power nya oke banget. Hari itu gue makan bakso, lanjut ke batagor n somay, disapu lagi pake es teh manis, ga ilang sodara2. Tapi mungkin saking matte hasilnya, bibir lo bakal keliatan kering banget, jadi rada kurang natural gitu. Tapi gpp, tinggal tampol aja pake lipgloss/lipbalm, beres.
 
 
Conclusion/Ikhtisar (taelah, ikhtisar...):
  • Matte result
  • Nice smell
  • Reasonable price: IDR 85K in online shops
  • Large variety of shades (but some of them comes in similar ones)
  • Medium staying power
  • Doesn't dry your lips
  • Pigmented. One dip per usage.
 
Repurchase?
 
Of course lah! I fell in love. How about you? Ever tried this before or deciding to buy one? Tell me what you think :)


Note: The result my vary to each individuals


Sunday, March 2, 2014

IBB MUC February 2014 "Summer Fairy Tale"

This is my second months since the first time I started blogging, and the first time I become one of the participants of Makeup Challenge presented by Indonesia Beauty Blogger community. The theme is Summer Fairytale.


Ok, anyway, this what comes in my mind about a summer fairy, or at least, this is what I wanna look like if I were reborn as a fairy:


How to do:
  1. Apply eyeshadow base and draw your eyebrow.
  2. Draw your upper liner and the "wings" using gel liner.
  3. Apply blue eyeshadow on all over your upper eyelids. Then apply purple and green shadows.
  4. Apply black eyeshadow to cut your crease.
  5. Draw your lower waterline with white pencil and your lash line with black pencil.
  6. Dust pink glitter on the "wings". Use petroleum jelly as the glue.
  7. Retouch your upper liner and the wing with gel liner again.
  8. Glue your fake eyelashes.


Full face view:


I look feisty for a fairy. I think my face suits a witch better with all red and black nuance. Hahaha.


These are the tools I used.

Base makeup:

Eye makeup:

Lips:
  • Viva Body Painting (purple)


This competition actually allows us to submit three looks, but IDK. Hope I will get the chance to create the second and even the third one, if my kid is asleep. Hahaha.

I kinda remember something after finishing the makeup. Why did I choose purple as my color theme for summer fairytale? What have I thought? Oh, what the hell. Winning or not, I still enjoy the process tho'. ^^


Oh, more snapshots using my phone camera. I think I look better using my phone camera thanks to its blur effect. LOL.


For other IBB MUC participants, I wish you all good luck. See you!


Saturday, March 1, 2014

Review: The Body Shop Lip & Cheek Stain

Lip tints are in right now, and those gradient lips style was like all over the place, it makes me kinda sick sometimes hahaha. Well, I have to admit that I'm not really into it because that look makes me look pale. But that's not the reason for me of not wanting a lip tint. 

For those of you who wants to try out a lip tint manufactured by a brand outside the booming Korea, you'd better try this.


I have been using this product for about a year, probably when they first launched it, it was on sale. The actual price was around IDR 160K or 170K, pretty expensive for me tho, but I was curious. My first lip stain was produced by Sugar Baby, I had a hard time looking for it once the product was run out because I thought the brand was discontinued in Indonesia, so I thought this one will be an equal substitute. And yeah... This is the only lip tint I have. At the moment, at least.


I think this only comes in one shade, the one you'd call vampy red.


The brush looks similar like the usual brushes for lip gloss. Very familiar.


The formula is watery, so this might be a problem for dry lips. It has a sweet scent of a fruit, maybe it's strawberry or IDK, it's very fruity LOL. It even tastes good when you lick it. But please don't eat this. It's a cosmetic, not a food.

The color may look vampy on the bottle, or once you tap this on you lips/cheek, but remember that you'll have to spread the liquid, and once you did, the color will look more natural. 

Judging from the name, this can be applied on both cheek and lips, but to be honest I barely put this on my cheek since it's a bit tricky to spread it perfectly and the color will fade away very quickly. Besides, putting this on your cheek will consume a large amount of the product, so I prefer my powder blusher instead.

This is what it looked like on my lips. And no... I didn't use this for gradient lips look LOL. I spread this to all over my lips instead, with my finger tips and added petroleum jelly on top of it. I love this, it gives me natural healthy looking lips. 


Here are a few tips when using this:
  • Dab a few spots on your lips/cheek using the applicator and spread them with your finger tips, do not rub. Just dab it.
  • For dry lips, use this first, let it absorb for a while then use your favorite chap stick or lip balm. I once tried wearing lip balm first before applying this, and the result wasn't blended perfectly. Remember the water-oil formula?
  • For gradient look, well... You know how LOL. I shouldn't explain any more further.

Okay, let's gather some facts about this reddish babe:
  • Only comes in one shade I suppose
  • Fruity scent and sweet taste, but it's not edible XD
  • Matte result
  • Perfect for 'no makeup' look
  • Very low staying power on the cheeks
  • Great staying power on your lips
  • Watery formula. Dry lips, beware!
  • Price: IDR 170K (USD 17)

Are those pros or cons? You decide!

Will I buy it again? Well, perhaps. This product gives a great effect on me although it makes my lips dry. But the shade is just purrrfect.

Orright, thanks for reading. Hope this article is useful for you. Any comments or suggestions are very welcome ^^

Note: result may vary to others.


Tuesday, February 25, 2014

The Blues Mood

Another eye makeup tutorial. Just like the title, I use blue shades as the main theme for this look. 

The first thing you gotta do is prime those eyes and draw the eyebrows using your favorite tools.
After that, lets move on to the steps.


  1. Apply bright yellow eyeshadow on you upper inner eyelids.
  2. Apply blue eyshadow on the rest of your upper eyelids. Blend.
  3. Apply black eyeshadow on your crease and your outer V. Wing it then blend.
  4. Line your upper eyelids and wing it.


    5.   Line your lower water line with white pencil and apply turqoise eyeshadow over it using an angle
          brush
    6.   This is optional. Apply turqoise eyeshadow on our lower lash line.
    7.   Glue your fake lashes, put on mascara, then curl your eye lashes.


And things are done!

And, a little snapshot with my phone camera. Huhuhuhuh...


Eye makeup credit:
  • Viva eyebrow pencil (brown)
  • NYX eye primer
  • Inez loose eyeshadow (satinee blue & sunstone yellow)
  • NYX single eye shadow (black)
  • Etude House Gel Liner (black)
  • Coastal Scents eyeshadow in turqoise (for under eye shades)
  • Maybelline Falsies mascara
  • Itsdiva Lashes
  • Ageha softlenses (Icy grey)


That's all for now. See you on my next posts! Comments or suggestions are very welcome ^^

Note: I am not a makeup artist nor did I learn to do makeup officially. I'm just someone who loves makeup and observing it by myself. So maybe you'll find some incorrect parts on the way I do my makeup.


Review: Inez Sparkling Loose Eyeshadow


Ada yang pernah denger kosmetik lokal dengan label Inez? Saya juga baru setahun ini denger merk ini, ternyata kalo buka web-nya, wooow line product-nya lumayan lengkap bo. Ini salah satunya:


Sebenernya aku agak penasaran juga gimana jadinya kalo brand lokal bikin eyeshadow bubuk yang bergliter. Yang aku tahu itu ada La Tulipe sama PAC. Tapi PAC mahal pastinya, dan yang La Tulipe warnanya gak banyak (kayaknya). Nah, yang keluaran Inez ini harganya sangat ramah pada tetangga kantong.

Kemasannya itu mirip kayak kemasan gel eye liner, terbuat dari kaca dan tutup plastik berwarna hitam. Di tutupnya itu ada kuas tersembunyi. 


Nih dia kuas tersembunyinya. Tinggal buka, balik, dan klik! Jadi deh kuas panjang. Kalo gak suka pake kuas panjang, gak usah di klik.


Gosh, I really love the color combination so I think I'm gonna spam you with some more pictures LOL.


Sebenernya dia ada 8 warna, tapi yang ungu waktu itu kehabisan terus. Padahal ungunya bagus banget.

This is close up look of each pot.


Color breakdown:
  1. Sparkling Silver: Salah satu warna yang paling sering aku pake, bisa buat highlight.
  2. Aztec Gold: Ini warna bronze, bagus banget. Ini juga salah satu yg palng sering aku pake selain silver.
  3. Satinee Blue: Ini biru yang sangat biru, biru tua kayaknya.
  4. Cherry Pink: Shimmering baby pink. Sangat-sangat muda, dan kalo diaplikasikan ke mata jadi mirip silver.
  5. Golden Moss: Warna hijau tentara. Bukan favorit saya sih, tapi warnanya juga bagus buat yang demen hijau.
  6. Sunstone Yellow: Ini aku bisa sebut sebagai warna emas. Sooo pretty.
  7. Glamorous Red: Yang ini warna marun. Walaupun judulnya merah, tapi masih aman dipake kok.

Pigmentasinya gila-gilaan. Cukup puk-puk dikit aja udah keluar banget:


Nah kelemahan eyeshadow ini, adalah dia gampang banget rontok kalo diaplikasikan, maybe karena dia bentuk bubuk ya. Dan karena berglitter, maka kemungkinan besar glitter-nya kemana-mana itu sangat besar. Jadi be prepared aja mendapatkan hasil wajah yang "mengkilat" karena glitter-nya transfer ke mana-mana.

Untuk pigmentasi, seperti yang udah aku sebut, dia dahsyat banget. Dan dengan pemakaian eye primer, maka akan lebih mantap lagi hasilnya. Eye primer juga bisa mengurangi efek bubuk yang berjatuhan ke pipi loh. 

Selama ini aku selalu memakai ini dengan eye primer, jadi kalo untuk daya tahannya sih cukup keren. Tapi aku gak tahu kalo gak pake eye primer, belom pernah nyoba soalnya.


I did an eye makeup tutorial using a few shades of these powder:


Yang ini males di crop:


Okay, let's gather some facts about these lovely creatures:
  • Sparkling effect
  • Medium stay power and after a few hours, some powder may fall on your cheeks :(
  • Very pigmented, love it!
  • Nice packaging
  • Brush included but not very useful since I prefer applying it with my finger
  • Applying these is a bit tricky
  • Price: around IDR 25K (I forgot, again)


Will I purchase again? IDK... These pigmented babes will take years until they run out. Until then, who knows?


Latest Post

First Impression: Evershine Moringa Series