Sunday, February 1, 2015

Review: Wet N Wild Mega Last Lipstick (Just Peachy & In The Flesh)


Well, actually there are so many temptations coming from various lipstick products, from the cheapest to the most costly. But my choice seemed to be coming back to these babies. Reading many review on this planet, I found that their shades are great dupes for many high end lipsticks.
 
I have reviewed several colors back then, you can hit the word 'Wet N Wild' on the tag section at the right part of this page. So I won't talk much about their packaging whatsoever since I wrote it down on my previous posts.


The shades I bought were Just Peachy and In The Flesh.
 
 These colors are similar to Lime Crime Babette (for Just Peachy) and Mac Twig (for In The Flesh).


When swatched on my lips, the shade seemed to be a lot lighter than the bullet. I don't understand the color change.
 

Just Peachy

This is a very pale peach (or pink?) that's so hard to pull off, it's too pale on me. Make me look sick. Maybe this color will suit people with extremely pale/fair skin with cool undertone and works best for dark smokey eyes look. The application is a bit streaky and the result on my lips are all patchy here and there. The solidity is even worse, it doesn't end up really opaque on me. My full lips look even fuller thanks to this color, and I don't mean it in a good way though. A total regret.


In The Flesh, taken indoor with medium lighting.
 
In The Flesh, taken indoor in extreme bright light.
 
In The Flesh is actually a dusty pinky brown color, a very wearable and safe color. This shade is a bit tricky to be photographed since it can look brown in a dark lighting, but turn to a little bit dusty pink in brighter lighting. The opacity is marvelous and the bullet glided smoothly on my lips. This is another treasure from Wet n Wild Mega Last Lipstick other than Bare It All, a total darling in my make up purse.
 
 
***
 
 
So far I have tried five shades from this Mega Last series. I used to have an excellent review over these products, but the more I tried the more I realized that not all of them have very opaque result. I'm talking about Just Peachy which is so chalky and streaky. But other than that, this lipstick is still my favorite, other than Revlon Super Lustruous series.
 
I would recommend a lip balm application first since these products have medium hydration effect. They're pretty long lasting but would faded a bit after meal. Both colors in this article stains my lips but not too much.
 
I really need to try other shades from this lipsticks, I don't know which one, but maybe I should buy them all to fulfill my curiousity? Should I? I have googled some reviews about Pink Suga, Stoplight Red, and Think Pink, but the more I searched, the more I confused.
 
 
For now, I won't leave you with my verdicts towards these lipsticks since I just found a good purchase for one product and a total let down for the other. I think you can summarize your own based on my reviews. 


I was wearing In The Flesh.


Friday, January 30, 2015

Review: Garnier BB Miracle Skin Perfector

Akhirnya setelah beberapa bulan menggunakan produk ini, saya memberanikan diri untuk menulis review. Semoga berguna ya, karena ada poin penting yang harus saya sampaikan.
 
Alright, now after using this for several months, I've finally decided to share my thought about this what so called a "BB Cream".


Garnier terkenal dengan produk perawatan wajah dan rambut, kayak Pond's sama Olay gitu loh. Makanya aku agak aneh juga pas liat ada BB Cream merk Garnier. Karena penasaran, ya udah comot deh. Mungkin mereka mau ikutan trend launching BB Cream juga.
 
Garnier is well known with their various skin and hair care products. So, seeing this among many other BB Creams kinda surprised me. Well, I thought they just didn't want to miss the chance of launching another BB cream product, which is a huge trend nowadays.


Klaim produk ini dahsyat banget: mencerahkan wajah, melembabkan kulit, menyamarkan noda bekas jerawat, mengurangi kilap wajah, dan meratakan warna kulit.
 
Oke oke oke, sekilas seperti klaim sebuah produk BB Cream kan? Padahal bukan. Ini bukan BB Cream, cuma pelembab biasa loh. Tinted moisturizer lebih tepatnya. Apa ya basa endonesa-nya tinted moisturizer? Pelembab berwarna kali ya...
 
 
This product claims to lighten your skin, correct blemishes, moisturizing, reduce oil, and even out your skin tone. As well as enriched with UV SPF 21 PA++ protection.
There is no choice of shade, though, so I guess they come with only one shade.
The letters BB on their packaging is totally confusing, because when I read it on their offical web (click here) instead of BB Cream, Garnier claimed this as a moisturizer. A tinted moisturizer, to be exact.
 
 
Swirl-type cap which is a bit unpractical. I dropped it, like, a lot.


Produk ini lumayan encer, bisa dibilang encer banget. Warnanya juga kekuningan, bukan abu-abu seperti kebanyakan BB Cream (kan udah dibilang ini bukan BB Cream heheheh). Warna ini cocok banget buat yang punya kulit kekuningan seperti rata-rata kebanyakan kulit orang Indonesia.
 
Baunya juga seger banget, seperti bau lemon. Kalo kamu biasa pake produk skin care-nya Garnier, pasti sudah hapal dengan bau khas-nya.
 
The consistency is very runny. It also has a yellow undertone, which is a benefit for women with yellow undertone. But on those pink undertones, this might make you look like a pumpkin.
And the smell, how do I describe it? It smells like lemon essence, like most of Garnier products. I can tell, the smell is 'so Garnier'.


Walaupun encer, tapi produk ini susah banget di-blend-nya.. Hiks... Aku sih lebih suka ngeratainnya pake jari. Kalo pake kuas suka keliatan bergaris-garis, terus kalo pake spon blending-nya jadi terlalu tipis, boros produk.
 
Begitu dia meresap rasanya enak banget. Kayak ada rasa seger-seger dingin semriwing, keliatan dewy, dan gak lengket sama sekali. Jadi kalo mau hasil yang natural, gak ditimpa pake bedak pun gak masalah. Muka jadi keliatan glowing-glowing gimanaaa gitu. Glowing ya, bukan oily. Tapi untuk hasil yang sedikit lebih 'berat' bisa ditimpa bedak lagi.
 
Despite its runny consistency, this product is awfully hard to blend. It is very very watery. To blend this, I prefer using my own hand.
Once it's absorbed, it leaves some glowy finishing. Not oily, just glowing. And it doesn't felt sticky at all. Really, it does not felt sticky! If you have naturally even skintone, you won't need to apply face powder afterwards for a super natural result.


Kalo untuk hasil akhirnya sih sanget sheer ya. Tipiiis banget. Itu urat nadiku sama sekali gak ketutup, hiks... Kayaknya ini cocok banget buat anak sekolahan yang mau pake makeup ke sekolah deh.
 
The coverage is poor. Well, I think I have to deal with that since this is actually a tinted moisturizer. I think this product is a good one for those teens who wants to wear light makeup to school.


Hasilnya di muka-ku. Well, ini sih udah ditambah sama concealer ya, kalo gak, gak bakal ketutup itu kantong mata sama bekas jerawat. Tapi hasilnya emang dewy banget dan gak terlalu keputihan. Hasilnya juga keliatan ringan dan natural banget.
 
 
The result on my face is very natural looking, not too bright. Although I still need the help of extra concealer to cover my blemishes and dark eye circles.
 
 
***
 
 
Well, seperti yang udah aku bilang, produk ini agak membingungkan. Judulnya BB Cream, tapi kenapa di web resminya ditulis pelembab. Jadi ini sebenernya pelembab atau BB Cream? Tapi daripada bingung, saya lebih suka menyebut produk ini dengan nama 'skin perfector'. Adil kaaan?
 
Karena hasil akhirnya yang sheer, maka produk ini cocok banget dipake sama orang yang nggak terlalu banyak punya 'dosa' di wajah. Aku suka sih pake ini, karena rasanya nyaman dan gak mengalami break-out. Tapi hanya pada saat-saat tertentu di mana kondisi kulit lagi super oke, nggak pas lagi jerawatan atau pas abis begadang, atau pas lagi pilek, atau pas lagi pusing dan tertekan karena lagi tanggal tua, gitu. Oh ya, karena efek dewy-nya itu, maka ini juga kurang cocok buat yang mukanya super oily ya.
 
Untuk daya tahan sih gak bisa lama-lama ya. Aku pernah pake primer plus produk ini buat jalan di tempat ber-AC, dan sekitar 1 atau 2 jam udah retak. Terutama pas dibagian pinggiran hidung. Jadi memang bukan produk yang bisa dipake buat seharian penuh atau berpanas-panasan.
 
This product is a benefit for those who doesn't have many skin problems to be covered. Also, because of its dewy or glowing effect, this may not be suitable for those with oily skin.
And I kinda regret its ambiguous product description, since it tricked many people. If this is a tinted moisturizer, so why does it have to be described as a BB Cream. I think I prefer the name a 'skin perfector'.
 
 
My take:
  • Moisturizes well
  • Yellow undertone, not too bright on me
  • Dewy finish
  • Comes only in one shade
  • Sheer coverage
  • This is a tinted moisturizer instead of a BB Cream
  • Smells like lemon essence
  • Poor staying power
  • Doesn't sticky
  • How much: about IDR 25K
  • Where to get this: Supermarket, minimarket, drugstore. Basically, it's everywhere.


Tuesday, January 27, 2015

Tips: How To Lengthen Your Gel Liner Life Span

Hai!

Kamu punya gel liner tapi sering banget gak bisa dipake sampe habis karena gel-nya udah keburu kering? Atau masih bisa dipake tapi susah banget diaplikasikan karena sudah mulai menggumpal? Bagus, berarti kamu baru saja memiliki alasan untuk belanja eyeliner baru. Tapi kalo kamu cewek atau cowok yang punya kebiasaan pake kosmetik sampe the very last drop (nggak gue banget sih) mungkin tips berikut bisa berguna buat kamu.


Musuh terbesar dari gel liner (dan eyeliner-eyeliner lain) adalah udara bebas. Jadi selagi kamu sibuk mengaplikasikan produknya ke matamu, please deh, tutup kemasannya. Kalo kamu males buka-tutup-buka-tutup, cukup dibalik aja kemasannya seperti gambar di atas. Hal ini untuk meminimalisasi kontak produk dengan udara.

Put your gel liner pot in upside down position whenever you're using it. This is to reduce the chance your gel touched by air.


Jangan malas membersihkan kuasnya setiap kali habis menggunakannya. Kalo aku sih usap aja pake tisu sampe bersih, baru langsung aku tutup. Lalu tiap beberapa hari sekali, cuci kuasnya pake sabun dan air. Jangan sampe ada sisa gel menetap di kuasnya karena begitu gel-nya mengeras, tekstur kuasnya jadi keras dan nggak enak banget pas dipake ulang. Oh ya, aku sih nggak menyarankan dibersihkan pake eye makeup remover karena ada kadar minyaknya. Nanti pas mau dipake lagi, kuasnya jadi agak-agak berminyak, dan akan mengurangi daya tahan produknya di matamu.

Clean your brush after each application with a dry tissue/napkin. I don't recommend using eye makeup remover since it contains some oil that may reduce the staying power of your gel liner on your eyes.


Gambar yang di kiri adalah gel liner Etude-ku yang sudah mengeras.

 Biasanya kita cenderung mengambil produk di satu titik yang sama sehingga menciptakan sebuah 'lubang kawah'. Maksudnya mungkin supaya keliatan tetep rapi dan cantik karena masih ada permukaan yang tetap licin. Namun hal ini dapat memberikan kesempatan bagi udara untuk bersarang dalam lubang tersebut. Untuk penggunaan berikutnya, colek gel liner di titik yang baru. It's ok kok kalo gak ada lagi permukaan yang licin/mulus. Oh ya, sebisa mungkin, colek produk menggunakan kuas dengan gerakan ringan saja, jangan ditekan.


This picture shows a comparison with my old Etude House Drawing Show Gel Liner. As you can see that I already made a gigantic hole on the gel surface, making the product dry easily. I would recommend you make a light stroke on its surface evenly. Don't make a hole since this will make the product dry easily.


***

Okay, I think that is all I can think of. If you have any idea, please leave a comment below.

Thanks for dropping by!


Thursday, January 22, 2015

Tutorial: How To Open Your Softlens Bottle With Bare Hand

Sebenernya yah, gue paliiing males kalo beli softlens dapet kemasan yang model botol begini. Soalnya susah dibuka. Ada aja apesnya, antara kuku gue yang cantik ini patah, atau tangan gue yang mulus ini jadi luka. Kan sakiiiit. Hiks...

Tapi itu dulu! Setelah berobat ke klinik Tong Fang, sekarang gue gak musuhan lagi sama botol softlens seperti ini karena udah tau cara bukanya. Yeeeay! And you know what, gue membuka ini dengan tangan kosong loh, gak pake pinset! Hidup jempol!

Having trouble with these stubborn softlens bottles that won't seem to be openned without hurting yourselves? Let me show you how to open them properly, with your bare hands. No tweezer nor scissor nor anything. Just your hand.


Oke, sebelom kita mulai, gue mo bilang kalo tutorial ini sebenernya lebih afdol kalo dibuat pake video. Tapi berhubung gue kaga tau caranya bikin video, jadi inilah usaha terbaik yang bisa gue berikan. Maap yah. Kalo elo ngerasa dengan foto nggak cukup, silakan buka video tutorial di YouTube, banyak. Tapi makan kuota-nya mana tahan.


Pertama-tama elo harus bisa menemukan sebuah tanda segitiga di bagian tutup alumunium-nya.
Gak keliatan?

Find a triangle mark on one side of the bottle. Right on the alumunium part.


Niiih, keliatan kan? Seharusnya tiap botol softlens memiliki tanda ini.

See it?


Kumpulkan segenap tenaga dalam pada satu titik tubuh yaitu jempol, lalu buka tutup plastiknya seperti gambar di atas, tepat pada bagian di mana terdapat tanda segitiga tadi. Kalo jempolnya sakit, boleh dibantu pake kain. Kalo gue sih pake baju aja.

Using your thumb, push the plastic cap open right in the triangle mark. You can use a piece of cloth to cover your thumb.


Masih menggunakan kekuatan jempol, dorong perlahan-lahan tutup plastik tadi hingga lapisan alumuniumnya robek sedikit demi sedikit. Inget ya, pelan aja, jangan napsu. Kalo sampe alumuniumnya patah, urusan berabe.

Push the plastic cap slowly and tear the alumunium cap. Do it really gently and don't break the alumunium.


Yaaak, dorong teruuus.

Keep pushing.


Sedikit lagiiii...

Just a tippy tappy tippy tappy tip tap more...


Naaah, kalo udah begini, udah hampir berhasil deh. Tinggal tarik aja tutup plastiknya dan seluruh bagian tutup plastik akan terangkat. Hmm, idealnya sih gitu. Tapi seringkali pas di titik ini, alumuniumnya putus. Kalo gitu mah gampang, tinggal lapisi jempol dengan kain lagi lalu tarik sisa tutup alumunium yang tersisa.

If you reach this setp, you can just pull the plastic cap and the whole part of the alumunium cap will be opened. If this fail and you break it in the middle, just pull the rest of the alumunium part using your thumb and a piece of cloth.


See? Kalo sisa tutup alumunium udah bisa terangkat, tinggal tarik aja tutup karetnya, dan urusan dengan si botol softlens ini pun selesai.

This time, you'd only need to push the rubber open.


Taraaa! Botolnya sudah terbuka!

Tadaaaa!


Tinggal ambil deh softlens-nya. Hmmm, pas di bagian ini gue sering nemu kendala: seluruh cairan udah ditumpahin tapi softlensnya keukeuh gak mau keluar dan malah nempel di dasar botol. Ya udah, cairannya ga usah ditumpahin, ambil aja softlensnya pake cotton swab. Tapi inget ya karena cotton swab/buds itu berserat, maka sangat dianjurkan untuk membilas lagi softlensnya dengan cairan pencuci softlens sebelum dipake. Gue pernah maen pake aja, gak dibilas dulu. Ga taunya ada sisa serat kapas nempel di softlens, perih booo.

If you find a hard time taking the softlens out of the bottle, simply use a cotton swab to take it out. Don't forget to rinse it with solution water before using it. Or else, some remaining part of the cotton swab will stick on the softlens and hurt your eye.


***


Baiklah, semoga cukup jelas dan berguna ya, adik-adik.


Tutorial: Sweet Pink & Purple Eye Make Up


Nah, jadi kan ceritanya kan bulan depan kan ada hari Valentine nih kaaan. Walaupun gue haram ngerayain gituan, tapi gapapa dong kalo gue bikin EOTD yang bertema Valentine. Mungkin elo udah bosen dengan segala sesuatu yang berbau pink dan ungu di hari Valentine, tapiii ah bodo amat. Gue kali ini mau mengusung warna klasik khas Valentine, yaitu pink.
 
Tapi pertama-tama gue mo bilang, maybe tutorial kali ini gak semaksimal biasanya karena gue masih gak enak badan (alesan!). Tadi aja abis kerokan. Tapi gue kangen sama alat make-up gue, jadi bela-belain deh bikin ginian. Heheheh. Yuk langsung aja.
 
 
First of all, here are the eyeshadow color you'll need:
  • Light purple
  • Dark purple
  • Baby pink
  • Skintone
  • White
*And make sure they're all matte.


After drawing your eyebrows, apply eyeshadow base on all over your upper lid.


Using a fluffy blending brush, apply a skintone eyeshadow on your crease and outter V. Blend it outside and inside.


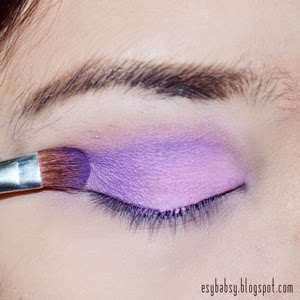
Using an eyeshadow brush, apply a baby pink color on all over your upper lid.


Using the same brush, apply a dark purple on your outter V and crease, just below the skintone color. Blend it with the pink.
 
*if you overdid with the purple, you can retouch the pink color again. I kept on going back and forth retouching the pink and the purple over and over again until I get just the right result.


Using whatever tools you prefer, frame your upper lid with black eyeliner. Don't have to be so neat or perfect, this is just to mark where your false eyelashes will be glued later on.


Apply eyeshadow base on your lower lid.


Apply purple eyeshadow on half part of your lower lid.
 
*you can use the same purple with the previous one, but since I want to make this look cute, I use a lighter purple. And if you want to make this look even cuter, try to apply a pink shadow instead of purple.


Fill the rest of your lower lid with white eyeshadow. Here I apply it with eyeliner brush.


Glue your false eyelashes. Don't worry if your eyeliner doesn't look so neat, we'll retouch it later on.


While waiting for the glue to be dry, line your waterline with white pencil.


Now that the falsies glue is dry, retouch your black eyeliner. Also try to cover all those naughty white glue that doesn't seem to change color after it's dried. The point is, blacken everything.
 
This is also the right time to change your wing liner shape. The longer, the naughtier. But since I want to keep this look so simple and cute, I just make a tiny wing eyeliner.


The last one is to curl your lashes and apply mascara.
Btw, I want to confess that I barely curl my lashes since they're almost invisible. So few and soooo short. But for those who have long lashes, you have to curl it.
 
And we are done!
 
For the best result, match this eye make up with pink blusher and pink lipstick.
 
 
***
 
 
Picture spamming!
 
 
Ini pake flash.
 
 
Ini juga fotonya pake flash.


Yang ini fotonya dongak sambil ngadep ke lampu neon, kaga pake flash. Tuuuh kan keliatan ada tangan gue lagi ngeker.

Btw, kenapa ya menurut gue hasil fotonya lebih bagus kalo pake camera flash ketimbang lampu biasa.... Ada yang tau kenapa gak?


Oke, ini adalah barang-barang yang gue siksa selama pembuatan:
  • NYX Eyebrow Gel (Brunette)
  • Wet n Wild Eyebrow Kit (Ash Brown)
  • NYX Eyeshadow Base (White)
  • Nonna Eyeshadow Palette No. 3 (White & Skintone)
  • BH Cosmetics Eyes On The '80s Palette (Dark Purple)
  • Lime Crime D'antoinette Palette (Baby Pink & Light Purple)
  • Koji Dolly Wink Liquid Liner (Black)
  • Max Factor Clump Defy Mascara (Black)
  • Unbranded falsies
  • Acuvue clear softlenses


Oke sebenernya EOTD ini adalah hasil recreate dari EOTD gue yang dulu. Tapi ga tau kenapa yah, kok hasilnya beda. Di look yang sebelumnya lebih ngepink, tuh tuh tuh kayak di foto atas. Tapi yang sekarang lebih biru-biru ungu gimana gitu, padahal warna yang dipake gak jauh beda. Hmmm, maybe kalo elo recreate makeup gue yang ini, hasilnya bakalan beda juga nih, kayaknyaaaa.
 
 
***
 
 
Baiklah, sampai ketemu lagi!
Muuuaaah.


Latest Post

First Impression: Evershine Moringa Series