Showing posts with label Tutorial. Show all posts

Monday, September 7, 2015

Tutorial: How I Draw My Eyebrows

Tanpa sadar yah, gue tuh gak punya stok tutorial bikin alis. Eh, ada sih, tapi itu setaun lalu waktu dandanan gue masih acakadut, alhasil cara bikinnya juga rada absurd, karena emang bener-bener hasil imajinasi. Dan gue yakin, orang-orang yang tau gimana teknik yang benar dalam menggambar alis, pasti ketawa atau geleng-geleng kepala liat post gue yang satu itu. Gak percaya? Coba aja cek di sini.

Karena makin ke sini gue makin sadar alis, hasil browsing google dan youtube, akhirnya gue putuskan untuk bikin tutorial baru, sesuai dengan rutinitas 'ngalis' gue yang akhir-akhir ini paling sering gue lakonin.

Oke, pertama yang harus gue tekankan, ada banyak jenis alat buat menggambar alis. Mulai dari yang paling basic yaitu pensil, terus ada eyebrow gel, ada yang bentuk pomade, maskara alis, eyebrow powder yang mirip eyeshadow, sampe yang bentuknya kayak spidol. Sayangnya gue belom sempet membahas jenis-jenis alatnya. Menurut lo perlu ga gue bahas?

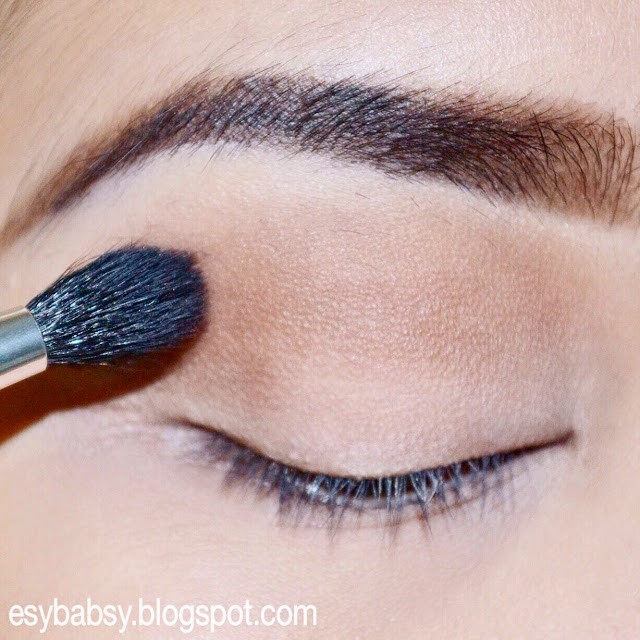
Di sini alat yang gue pake adalah Etude House Drawing Eyebrow warna Black Brown, sejenis pensil alis tapi bentuknya pipih. Sebenernya alat yang biasa gue pake bukan ini, melainkan Wet n Wild Ultimate Eyebrow Kit (yang amazing bangetttt), tapi gue pake Etude ini untuk keperluan review produk juga hehehe. Tapi yah, intinya sama aja kok.


tutorial-how-i-draw-my-eyebrows-esybabsy

Pertama, always start with clean eyebrows. Jangan sampe ada produk makeup apapun tersisa di alis.
*cukur alis di sini optional, ini pilihan gue. Kalo elo ga mau cukur alis, ya ga usah.


tutorial-how-i-draw-my-eyebrows-esybabsy

Menggunakan sikat alis yang bersih, rapikan rambut alismu. Untuk step ini kamu juga bisa menyisir alis menggunakan maskara bening atau wax alis supaya rambut alis lebih rapi. Atau kalo mau lebih ekstrim, bisa juga semprot hairspray di sikat alismu (baek-baek alis rontok!). Tapi kalo gak punya, disisir pun cukup.


tutorial-how-i-draw-my-eyebrows-esybabsy

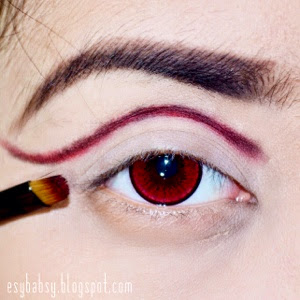
Buat garis di bagian bawah alis mulai dari bagian dalam alis di dekat hidung sampai ke ujung.
Biar alismu nanti keliatan rapi, usahakan garisnya itu berada 'lebih bawah' dari ujung rambut alis yang kadang suka turun-turun lagi meskipun udah disisir.


tutorial-how-i-draw-my-eyebrows-esybabsy

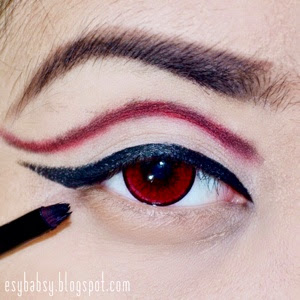
Taris garis lagi di bagian atas alis, dimulai dari 3/4 bagian dalam alis lalu pertemukan di ujungnya. Untuk lengkungan di puncak alis, lebih manis kalo kamu bentuk membulat ketimbang garis patah/runcing. Biar ga keliatan kayak digambar banget gitu. Tapi ini selera sih.


tutorial-how-i-draw-my-eyebrows-esybabsy

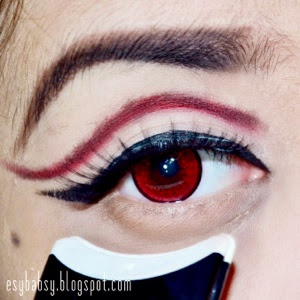
Isi bagian 3/4 bagian lam alis yang kosong dengan pensil alis. Untuk step yang ini, biasanya gue lebih suka menggunakan eyebrow powder atau eyeshadow karena hasilnya keliatan lebih terisi, dan lebih gampang juga.


tutorial-how-i-draw-my-eyebrows-esybabsy
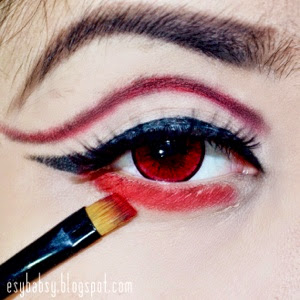
Isi sisa bagian alis yang kosong dengan pensil tapi dengan gerakan yang lebih slow, alias gak ditekan. Untuk bagian dalam alis, kadang suka gue gambar mengikuti arah alis tumbuh (ke atas) biar hasil akhirnya nanti keliatan lebih halus gradasinya.


tutorial-how-i-draw-my-eyebrows-esybabsy

Buat gradasi alis mendekati puncak hidung.
Untuk step ini gue menggunakan alat apapun yang bisa gue pake. Kadang pake ujung pensil, pake ujung jari, pake sikat alis/maskara, atau dengan eyeshadow. Intinya bikin gradasi sehalus mungkin yang nanti akan nyambung ke batang hidung. Yang penting lagi nih, usahakan gradasinya gak terlalu dekat dengan alis sebelahnya, ntar alis lo keliatan nyambung. Hehehe.


Naaah, ritual alis yang gue kerjain untuk makeup sehari-hari sih biasanya sampe di sini aja. Tapi untuk saat-saat tertentu, kayak mau ke acara resmi, pas lagi makeup-in klien, atau untuk sekedar foto-foto blog, gue akan menambahkan langkah-langkah berikut:


tutorial-how-i-draw-my-eyebrows-esybabsy
Aplikasikan concealer di bagian atas dan bawah alis menggunakan kuas concealer.


tutorial-how-i-draw-my-eyebrows-esybabsy

Lalu blend serapi mungkin. Step yang terakhir ini, berguna banget terutama buat kalian yang gak mau cukur-cukur alis karena dapat menyamarkan rambut di sekitar alis yang udah kamu bentuk. Begituuuu!
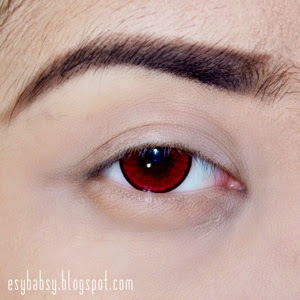

Hasilnya:

tutorial-how-i-draw-my-eyebrows-esybabsy


Ketebalan dan warna alis suka gue sesuaikan dengan mood dan sikon juga, cuma gue lebih seneng alis dengan warna coklat tua ketimbang coklat kemerahan. Lebih tegas aja gitu.


tutorial-how-i-draw-my-eyebrows-esybabsy


Ok, gue harap tutorial ini cukup jelas ya. Kalo ada yg mau ditanyain, monggo komen aja.


Thursday, August 27, 2015

Tutorial: Natural Daily Eye Make Up


tutorial-natura-daily-eye-makeup-esybabsy


Setelah di post sebelumnya gue bikin tutorial alis, sekarang gue mau buat lanjutan eye makeup-nya. Sesuai judulnya, eye makeup ini cocok banget buat dandan sehari-hari karena warnanya natural. Dan pastinya praktis karena cuma butuh dua warna eyeshadow paling basic yaitu coklat tua dan hitam.

Ya mulai aja deh.


Langkah pertama dimulai dengan hati yang tenang, dengan begini kita akan lebih mudah melakukan apapun yang kita mau dengan hasil yang lebih maksimal dibanding bila kita mengerjakannya dengan terburu-buru. Hehehe... 


tutorial-natura-daily-eye-makeup-esybabsy

Pertama bentuk alismu sekece mungkin.
*Kalo kamu melakukan makeup ini pada wajah orang lain, biar lebih efektif gambar alisnya belakangan aja.


tutorial-natura-daily-eye-makeup-esybabsy

Baurkan eye primer atau eyeshadow base di seluruh kelopak mata menggunakan ujung jari atau kuas.

Apply your favorite eyeshadow base/primer on all over your eyelids.


tutorial-natura-daily-eye-makeup-esybabsy

Dengan crease brush atau tappered blending brush, bubuhkan eyeshadow di area outter V lalu baurkan ke seluruh bagian lipatan mata/crease. Seperti yang bisa kamu lihat di gambar, fokus pada area yang diberi garis ya.

Apply dark brown eyeshadow on the outter V and blend it onto the crease.


tutorial-natura-daily-eye-makeup-esybabsy

Masih menggunakan kuas yang sama, buburkan sedikit eyeshadow warna hitam di outter V saja. Lalu baur hingga menyatu dengan warna coklatnya.

Apply a lesser amount of black shadow on your outter V and blend it with dtha dark brown.


tutorial-natura-daily-eye-makeup-esybabsy

Bingkai kelopak atas dengan eyeliner dengan bentuk sesuka kamu. Karena gue mau bikin ini senatural mungkin, jadi gue bikin garisnya simpel aja.

Line your lid with black eyeliner.


tutorial-natura-daily-eye-makeup-esybabsy

Tempelkan bulu mata palsu.
Step ini sebenernya gak wajib, namanya juga natural makeup. Kalo gak mau pake bulu mata palsu, cukup jepit bulu mata dan bubuhkan maskara. Kalaupun mau pake bulu mata, pilih yang modelnya natural aja.

Apply fake eyelashes. Or you can simply curl your lashes and apply mascara if you don't wish to use fake lashes.


tutorial-natura-daily-eye-makeup-esybabsy

Biar mata keliatan lebih 'bersih' dan 'bening', garis waterline-mu dengan pensil putih.

Line your waterline with white pencil.


tutorial-natura-daily-eye-makeup-esybabsy

Bubuhkan maskara di bulu mata bawah. 
Step ini juga membantu matamu keliatan lebih besar. Untuk hasil yang lebih cetar membahana, bubuhkan maskara dua lapis di bulu mata bawah. Kasi jarak sekitar 5 menit pada tiap pengaplikasiannya biar hasilnya lebih maksimal.

Apply two coats of mascara on your lower lashes.


***


Hasil akhir:


tutorial-natura-daily-eye-makeup-esybabsy


tutorial-natura-daily-eye-makeup-esybabsy


Product used:

  • NYX Cosmetics single eyeshadow in Dark Brown & Black
  • NYX Cosmetics retractable eyeliner pencil in White
  • NYX Cosmetics eyeshadow base in White
  • Masami Shouko Tappered Blending Brush No. 219
  • Dolly Wink Liquid Eyeliner in Black
  • Max Factor Clump Defy Waterproof Mascara in Black
  • Dolly Wink lashes (replika)
  • Baby COlor Candy Rainbow softlenses in Blue

Maap yak kalo eyemakeup-nya gak terlalu keliatan karena emang aslinya soft banget sampe susah gue mau capture biar keliatan di kamera (alesan hehe). But trust me, in real life, eye makeup ini akan memberi kesan mata sedikit terangkat dan wajah yang keliatan dewasa. Bukan imut ya, tapi DEWASA.
:D

Baiklah, semoga bermanfaat. Oh ya, mau nanya. Sukur-sukur kalo ada yang mau jawab. Enaknya tutorial gue dibikin foto satu-satu begini atau dibuat kolase? What do you think? 


Wednesday, May 13, 2015

Tutorial: Romantic Blue and Purple Eye Makeup


This look was featured on my previous review about Silky Girl Duo Eyeliner (read it here). I already prepared  the pics for the pictorial but haven't got the mood to edit them. But well, here they are now. It looks gawjess for an evening makeup, and gives you that romantic glow on your eyes.

I use four colors to create this: black, dark brown, purple, and blue. Ok, let's start.


Do your eyebrow routine.


Apply an eye primer on all over the lid.


Using a tappered blending brush, apply a dark brown eyeshadow on your crease. Blend.


Using a clean blending brush, apply the purple on all over your lid except for a little area on the middle. Please note that you musn't cover the brown color applied earlier.


Tap an eyeshadow base on the empty space of your lid.


Pat the blue eyeshadow.


Then blend it with the purple. Don't go overblend.


Apply black eyeliner. Choose the eyeliner shape you love the most. For me, I'd go with a bold winged liner.


This step is optional. Apply your false eyelashes.


While waiting for the flasies glue dry, apply black pencil liner on your waterline.


With an angled brush, add black eyeshadow on your lower lash line then smudge it.


Last, apply some whte glitters on your tear duct area. You can also replace this with silver or white eyeshadow.


Apply some mascara and curl your lashes as the final touch.

And you are done!

Final result:

*please note that below pics were made earlier on different occassion, so you might notice some differences with the pictorials above.


Deets:
  • Wet n Wild Ultimate Eyebrow Kit "Ash Brown"
  • Etude House Proof 10 Eye Primer
  • NYX Eyeshadow Base "Mate White"
  • Nonna Eyeshadow Palette No 3 (Brown)
  • Silky Girl Double Intense Duo Eyeshadow (Purple Storm)
  • ELF Cream Eyeliner (Black)
  • Sleek Acid Palete (Black)
  • La Tulipe Glitter (White)
  • Viva Automatic Pencil Liner (Black)
  • Max Factor Clump Defy Mascara (Black)
  • D'eyeko Falsies "Siti Liza Asmara"
  • Eye Candy Bulle "Blue Gray" (worn on tutorial pics).


Bonus picture of my full face:

Hope you like it.


Thursday, March 5, 2015

Tutorial: My Bloody Valentine's Guideline


For those of you who read my blog, you might notice I did a collaboration on Valentine's Day with my fellow  beauty bloggers (click here). The picture above was the look I submitted. It's such an easy look, super easy and doesn't require a lot of products. If you wonder how to do it, let's read this post to the end. And btw, I posted this on my Instagram account, but it wasn't very detail.

There are two parts I did for this look: the eyes and the slit/wounds on my cheeks. Let's do the eyes first.


THE EYES


Draw your eyebrow. Applying eye primer is optional.


With an angled brush and red eyeshadow, draw a line along your crease like this. Top that red shadow with black eyeshadow.

*you can also use a red and black pencil. Whichever you think easier.


Frame your upper lid with eyeliner. Here I black gel liner and the brush from the product.


Glue your falsies.


While waiting for ghe glue to get dried, using an angled brush, apply the previous red shadow on your lower lash bed.


With an eyeshadow brush, blend that red shit out.


Top the previous red shadow with a black eyeshadow.


Again, blend that black. Btw, do you notice that the glue have dried out already?


Retouch your eyeliner again, just to cover all those imperfections caused by the falsies glue.


Apply red eyeshadow using anangled brush on your waterline.
Actually, most people use red pencil, but my eyes are extremely watery. So I need something 'stronger' than a regular pencil.


Apply mascara. I don't curl my lashes since they are so tiny and almost invisible. But if yours are long and thick, I suggest you to curl them.


Apply some blood gel or food coloring using a cotton swab on previous crease line to make the effect of a 'bloody cut crease'. Literally. Try to apply it randomly. Not too perfect and not too much.


Final result:


***


THE MOUTH SLIT


What you'll need:
  • A peel-off mask (I use Garnier mask).
  • A Scissor or razor
  • A sponge.
  • A lip brush.
  • Red and black face painting, or you can use red/black eyeshadow/lipstick/pencil.
  • Blood gel or red food coloring.
  • Some pins or needles (optional)


Apply your peel-off mask on your cheek. Right beside your lips, pointing to your ears. Try to imagine the shape a ripped-mouth. Do not apply it too thick or it will take forever to dry out. Wait until it gets dry, then apply your foundation and set it with translucent powder.


Using a scissor or pinset, cut the mask into the shape of a ripped mouth. Just use your imagination.


Mix the red and black face paint until it become a dark red shade. Apply it on the middle of the wound. Try to make the end as pointy as possible.


Dab the red paint on each side of the wound. Try to leave some 'white line' along side of the wound to make it more realistic. Do not spread the red paint to much. We want to focus on the ripped-mouth only. If you do, simply erase the paint with make up remover and reapply the foundation.


Apply blood gel or food coloring on the wound. You can use a cotton swab.


If necessary, add some pins or needles. Buuut please don't stick it right through your flesh, will ya.


Deetz:


Face
  • Maybelline Dream Liquid Mousse Foundation (Light) mixed with La Tulipe Cover Foundation (Natural)
  • Kryolan TV Paint Stick (NG1) for contouring
  • NYX Single Eyeshadow (Dark Brown) for contouring
  • Oriflame studio Finish Translucent Powder
  • Maybelline BB Silk Powder (Natural)
Eyes
  • SilkyGirl Eyebrow Pencil (Dark Brown)
  • Wet n Wild Eyebrow Kit (Ash Brown)
  • Sugarpill Pressed Eyeshadow (Love+)
  • Sleek Acid Palette (Black)
  • SilkyGirl Gel Eyeliner (Black)
  • Yukkiyuna Falsies (Victory)
  • Max Factor Clump Defy Mascara (Black)
  • Princess Universe Softlens (Mars)
  • Red Food Coloring fro the blood
Lips
  • Max Factor Max effect Gloss Cube (Wild Cherry)
Wounds
  • Garnier Peel-Off Mask
  • Red Food Coloring


This look is easier if you made this using liquid latex or spirit gum, but since I'm a cheapskate, I replace this with a peel-off mask. Of course nothing can beat the elasticity of those magical stuff and I will strongly suggest to use them for professional purposes. This is just for fun. And by the way, it is not my original idea, my fellows Annisa Lesmana and Aldila have done this before.


Hope this inspires enough. See you!


Latest Post

First Impression: Evershine Moringa Series